The Green Pepper 533: Rugged Tote and Portfolio

Inside pocket with D-ring
Outside constructed corner of tote
Inside constructed corner of tote
Tote corner tucked inside

This was kind of a spur of the moment project for me. I wanted to do something a little different from garment sewing and decided to venture into bagmaking. My toddler has been maxing out his diaper bag lately between potty training but still using diapers, bigger clothes, snacks, etc. I’ve been keeping a backpack in the car with the lesser used stuff and a medium size LL Bean tote for his more frequently used stuff and have been wanting to consolidate into one bag because I also tend to keep some of my own stuff in his diaper bag. This pattern was attractive to me because it is simple and uses minimal speciality materials.

Background

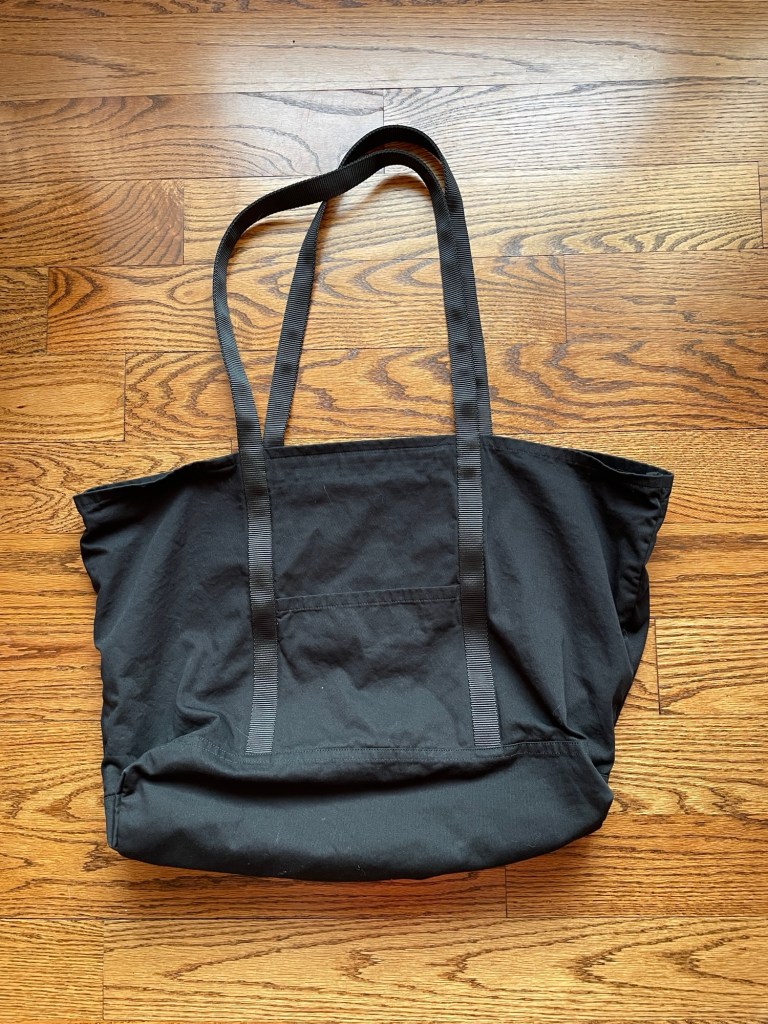
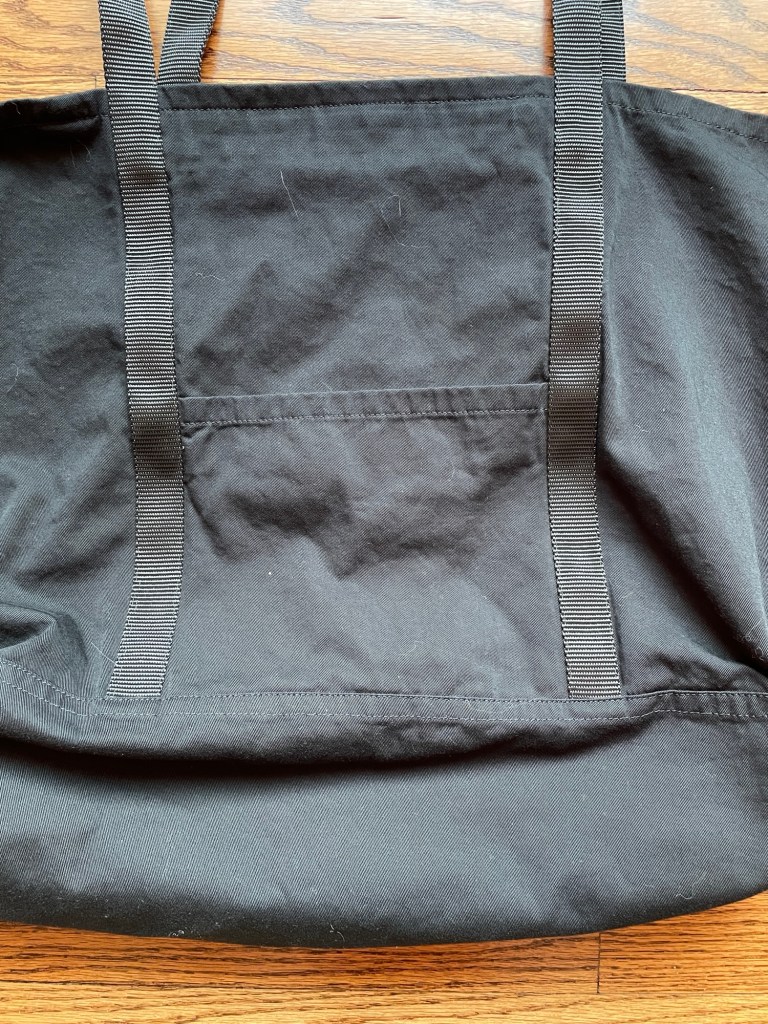
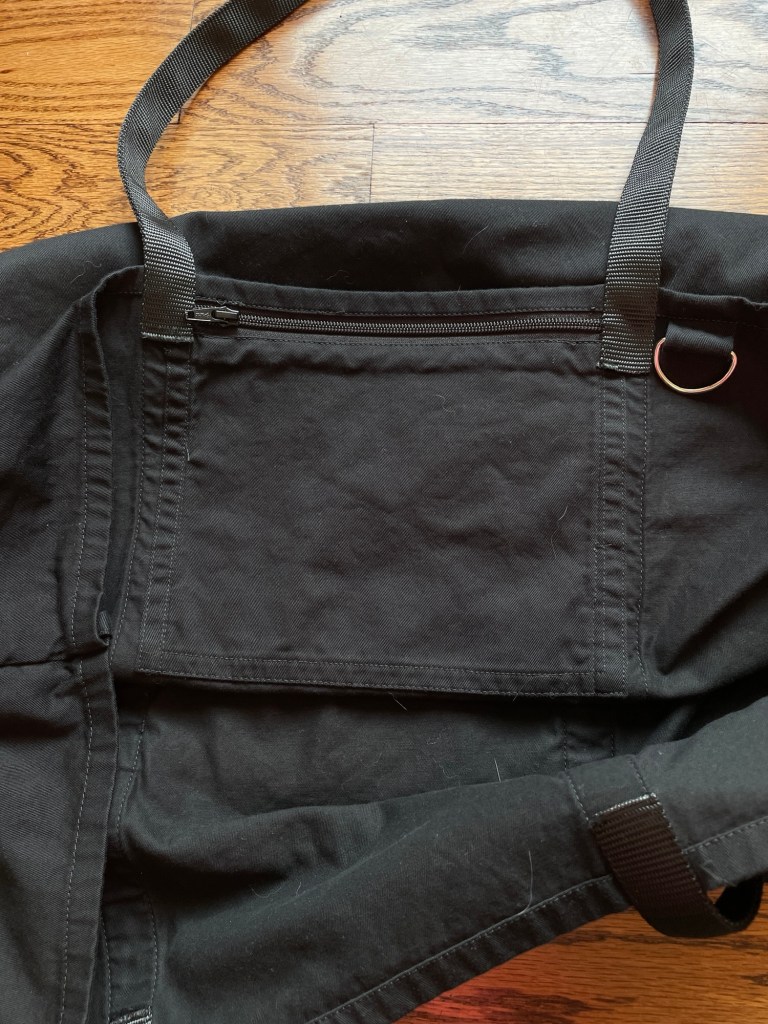
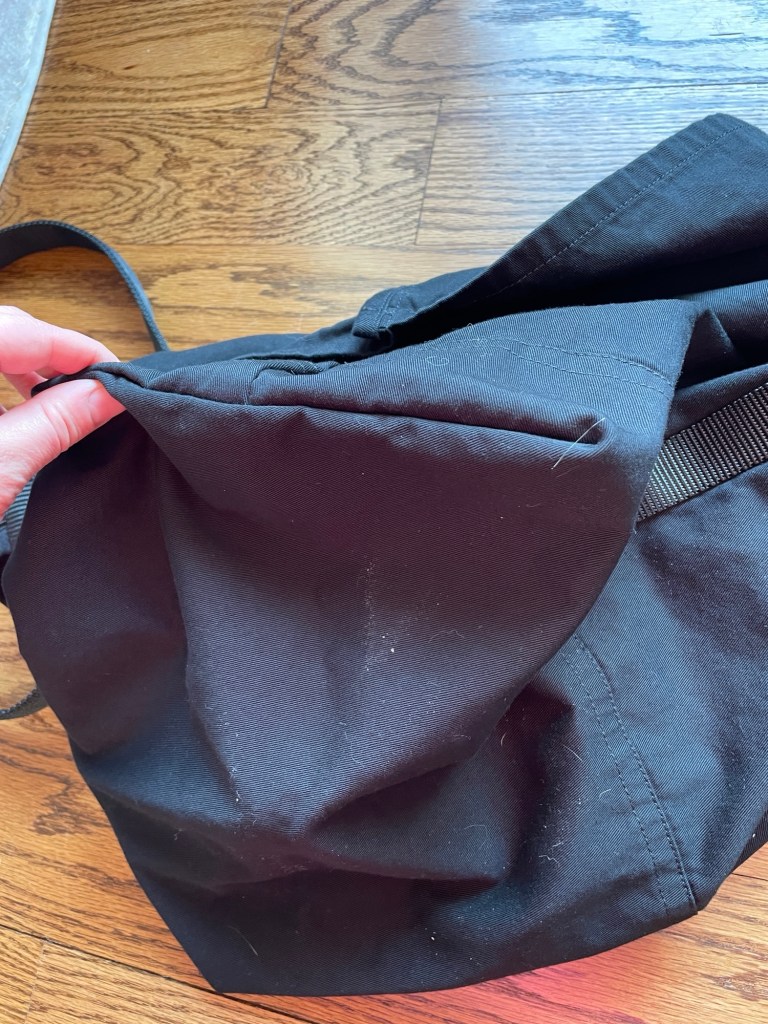
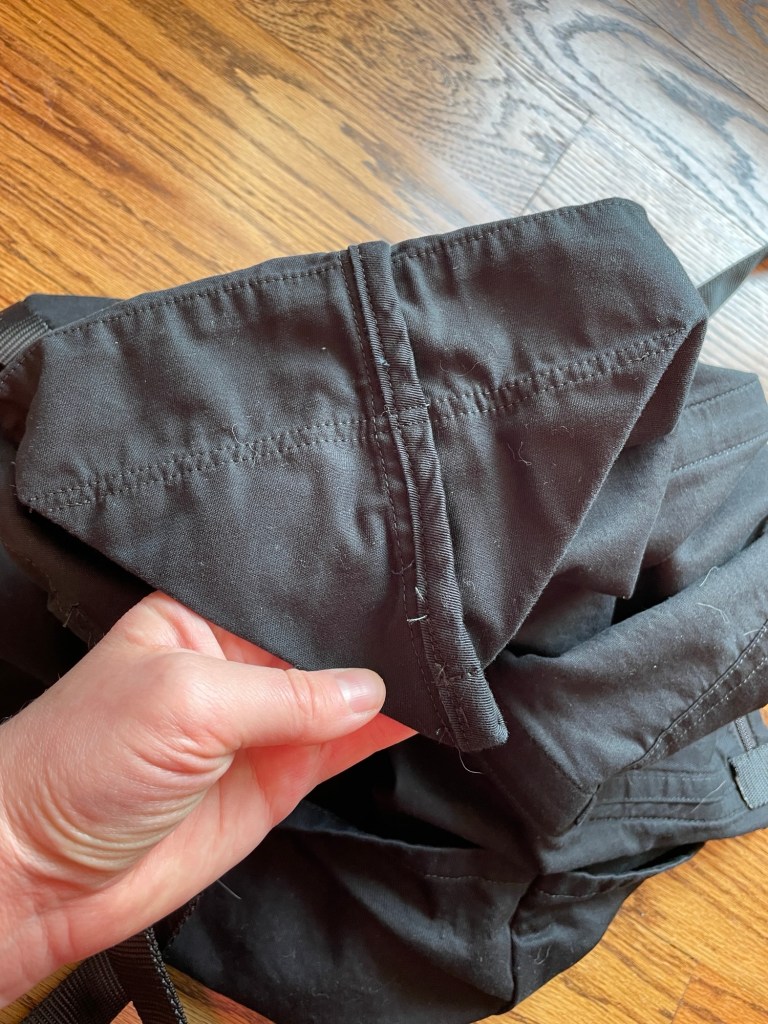
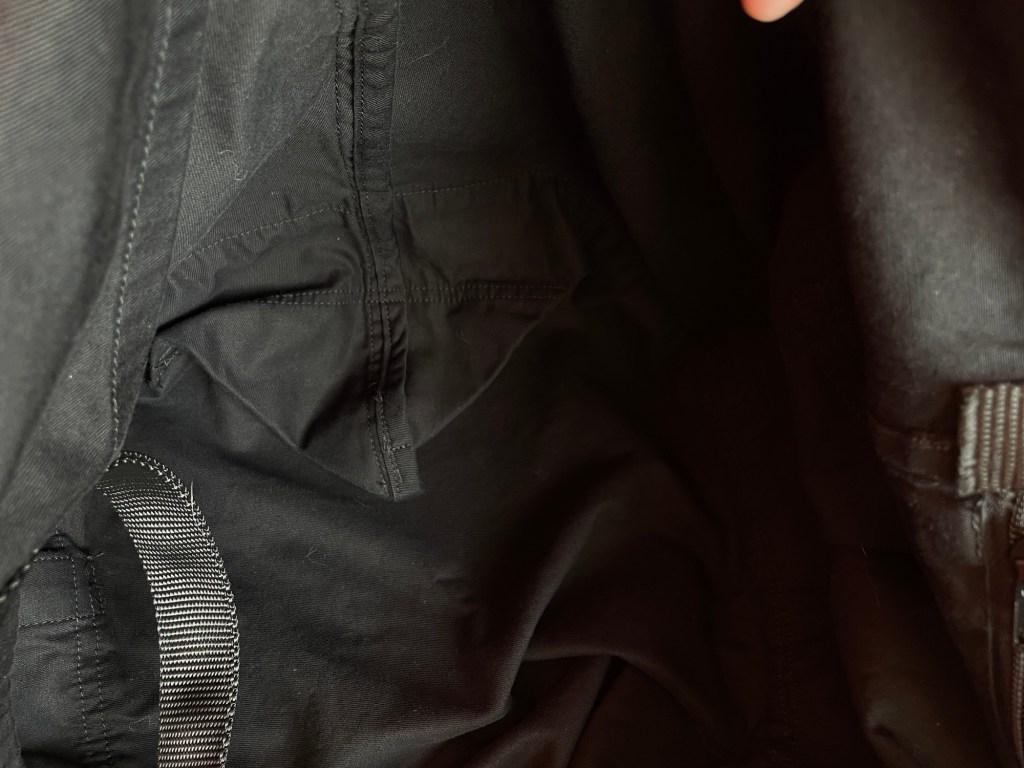
The Rugged Tote and Portfolio from The Green Pepper is an unlined tote bag with optional exterior pockets, a zipped interior pocket, and D-ring for keys. You can use either webbing or self fabric for the straps, which come in regular and long lengths. The bottom of the bag is actually a double layer of fabric, as a separate bag bottom is sewn onto the main body of the tote. If you made it out of 25 oz canvas it would be very similar to the LL Bean Boat and Tote.

The tote and portfolio styles use the same pattern pieces. The only difference is that you sew the corners of the bag into a triangle at the end to make the tote version.

There are four tote sizes, listed below as height x width x depth:

  • Small: 11.75” x 9.5” x 5”
  • Medium: 13.25” x 13” x 6”
  • Large: 15” x 16.5” x 7.5”
  • Extra-large: 16” x 19” x 8.5”

These roughly correspond to the size of the LL Bean Boat and Tote bags.

I made the extra large tote with the long straps and all of the optional pockets and D-ring.

Materials

Recommended fabrics are sturdy midweight to heavyweight fabrics like denim, canvas, and Cordura.

I used a midweight black 100% cotton twill I had in my stash for over ten years. For the straps I used nylon webbing. The zipper is a #5 nylon coil zipper from Wawak that was also in my stash. I used Gutermann Mara 70 thread for all construction.

The keyring was a 1.25” D-ring I’ve had in my stash forever from Bagmakers Supply.

Construction

I thought the included instructions were pretty good. I just was working very late at night and got confused about the zipper and how the ends of it were secured close until I went further along and realized that the inside strap actually covers it.

Jalie 2111: Men’s and Boy’s Classic Shirt

Pattern Background

Jalie 2111 is a classic men’s shirt pattern. It has a relaxed fit with a back box pleat, banded collar, and shaped hem. Both short and long sleeve pattern pieces included in the envelope. The cuffs have two buttons so you can wear them either tighter (like my son is in the photos) or looser, depending on your preference. The long sleeves have a shirt sleeve placket with a button. There’s also a chest pocket but I chose to leave that off this time.

Sizes go from 2T (22” chest) all the way to size XXL (47.25” chest). The wide size range, in addition to the timeless style, is what sold me on this pattern.

This is an older pattern, from 2001, so while it is no longer in print you can still buy it as a digital pattern. I ended up having it printed using the website PDFplotting.com. I used the higher quality paper available and found the service reasonably priced (if you do a bulk order like me) and quick to arrive. Highly recommend this service!

Alterations

I cut a size 3T. My son is on the verge of outgrowing European size 92 right now (2T) so I cut a size 3T just so he would have more time to wear it. I added a total of 2” around the hips because he still uses cloth diapers and needs the extra room.

Fabric and Notions

I used a 100% cotton shirting from Fabric Mart. The buttons were from WAWAK. I used a lightweight shirt crisp cotton interfacing from Fashion Sewing Supply for the collar band, collar, and cuffs.

Construction

I was happy I made time to work on this project, as it was my very first project using my new Juki TL-2010Q. This shirt was great for getting to try out my new presser feet as well as just get used to the feel of the machine. I was super happy with how the machine performed. I finally got used to using the machine threader and the feel of the presser foot (which has the auto thread cutter built in). And unlike my Janome 6500, the auto thread cutter works GREAT and doesn’t leave any ugly thread nests.

One of the nice things about this machine is that it can use regular industrial feet, which can be found for very cheap. For this project I used my new compensating foot set, topstitch guide set, and rolled hem foot set. I was particularly impressed by the performance of the rolled hem foot. It had no trouble at all going around the shaped hem and did a perfect job the first try. My Janome foot, by comparison, struggled to feed anything other than a perfectly straight edge.

I didn’t have the best of luck with the old Greist/Singer buttonholer for the buttonholes. For some reason the stitches kept skipping so rather than continue to fuss with it I just used my Janome 6500 and automatic buttonhole foot. For some reason I still had a bit of skipped stitches at the very start top of a few buttonholes, but a zigzag with the feed dogs dropped was able to save them.

The instructions included with the pattern are typical of the older Jalie patterns and not the best. In particular, the section for how to construct the front button band was rather confusing and I ended up redoing it before finally understanding what they meant. Another part of the instructions were wonky where the illustrations for the final steps are randomly thrown in the middle of the illustration for some middle steps. I might do a sew along and take a bunch of photos the next time I make this shirt.

Conclusion

My son loves how dapper he feels in his new shirt! He had no problem at all moving around in it to play outside today for 3.5 hours. It can be hard finding long sleeve button down shirt patterns for smaller sizes so I’m glad Jalie still offers this pattern.

Jalie 3884: Frédéric Hoodie

Background

The Jalie Frédéric is drafted for men and boys, sizes 2T to 50 (XXL). It has zippered pockets, ribbed cuffs and hem, a full zip, and lined hood with drawstring. The front and back are seamed at the waist.

While it is drafted for men and boys, women can use this pattern too as long as they’re aware that it falls straight down from the chest and the hips are drafted smaller than they would be for a women’s pattern. (I’ve also found that Jalie men’s patterns tend to be drafted with longer body and sleeve lengths than the women’s patterns.)

I made this for my two year old son. I was specifically looking to make him a non-bulky fleece jacket he could wear while traveling in his car seat during the cold months. (I never realized how problematic winter coats could be for kids using car seats until I actually had a kid and quickly found out that puffy down jackets are a no-no for car seats.)

Fabric and Notions

Suggested fabrics are stable sweatshirt fabrics, with rib knit for the cuffs and hem band and lightweight jersey for the hood lining. The seaming and colorblocking potential makes it a great stash buster, especially for the little sizes.

I used 4-way stretch Polartec fleeces for the body, sleeves, and hood. Both are scraps from previous projects and purchased years ago from Fabric Mart. I think it’s possible the black fleece is 15 years old at this point!

I used a black cotton ribbing from my stash for the cuffs and hem band. It was from either Nature’s Fabrics (my most common source for ribbing) or Fabric Mart. As a side note, Jumping June Textiles is also a great source for ribbing, especially if you’re looking for the heavier 230 gsm weight more suitable for sweatshirts.

The hood lining was cut from an old modal/cotton/lycra jersey Amazon Essentials t-shirt of mine.

The front zipper is a #3 YKK molded plastic separating zipper from WAWAK I had in my stash. The pocket zips are plain YKK #3 nylon coil non-separating zippers, also from WAWAK. The pattern referred to “nylon oil zipper” for the pockets, which left me totally confused until I realized it was likely a typo and meant to say “nylon coil zipper” instead.

The grommets for the drawstring are also from WAWAK. The drawstring for the hoodie was part of a 3/8” herringbone weave cotton drawstring color assortment from Amazon.

Fit and Sizing

I cut a size G (3T) for my son. It’s big for him, but he’s grown SO much since his birthday four months ago (like 1.5”) that I’m reluctant to make his actual size right now, which would be 2T.

The only alteration I made was widening the hip area by 2” to make more room for his cloth diapers.

I’m really happy with the fit. It isn’t too bulky and layers nicely over sweatshirts, while allowing plenty of room for future growth.

Construction

The most challenging part of this jacket is probably the zippered front pockets. If you look at the “Tutorials and Resources” section of the pattern listing on Jalie’s website there is a handy written tutorial with photos on how to construct them (though I didn’t use it myself).

The seam allowances included are 3/8”. When I make this pattern again (either for my son in a larger size, or for my husband) I will trim down the seam allowances on the pattern to 1/4” for everything that’s able to be sewn on the serger.

Since my fleece is so stretchy, when it came time to attach the zippers (both pockets and front) I ended up using strips of some Pro-Sheer Elegance fusible interfacing for stabilization. I also used a scrap of this interfacing for stabilizing the section of the hood where the grommets are set.

Conclusion

I’m very pleased with how this jacket came out. It isn’t a super quick project that I could bang out in a couple of hours, but he’s wearing it so much that it was well worth the effort.

With the chaotic tariff nonsense causing issues with importing back issues of the Ottobre pattern magazine, I find myself using Jalie patterns more and more. I’m doing a lot of family style sewing at this point in my life and the wide range of sizes, reliable drafting, simplicity, practicality, and often unisex styles make them surprisingly cost effective.

Jalie 4239: Zip Front Hoodie

I was interested in making myself a relaxed fitting zip front hoodie with pockets that would be more suitable for layering than my beloved Ottobre hoodie.

Background

This is a zip front hoodie in two lengths: hip and mid thigh. There is a front waist seam with front angled pockets. Ribbing is used for the cuffs and hem band.

Materials

I used a 100% cotton 230 gsm weight red sweatshirt fleece from Nature’s Fabrics I got on sale sometime during the last few months. It was wonderful to sew and is wonderful to wear!

The ribbing is a 230 gsm weight ribbing from Frollein S. Unfortunately she shut down her fabric store right after my purchase, which is too bad because I had just discovered the store and she had such wonderful stuff!

The zipper is a #5 molded plastic YKK zipper from WAWAK. I used these zipper stops from a kit I got from Amazon to shorten it.

Fit/Alterations

As usual per Jalie the sizing is pretty inclusive and goes from 2T to 2X (womens size 24). Per my measurements I cut a size Y (40” bust) for the top and tapered out to a BB (47” hip) for the bottom. I would say it is a more relaxed fit but not baggy. In my photo I’m layering a slim fitted tee under a long sleeve fitted merino wool top under it, and it feels like it has the perfect amount of ease for this.

My waist is a size W (31.5”) so just for the back I tapered to the size W cutting line, just for a tiny bit of extra shaping.

I feel like the sleeves run a bit short for Jalie and added an inch to the length. I also added 3/4” with to the sleeves at the bicep/elbow (pretty normal for me no matter what the pattern brand).

It was tricky figuring out how to add the extra with at the hem for the front, so below are my altered pieces in case if you also need to alter from waist to hip and having a hard time envisioning what to do. I went from a Y at the waist seam to a BB at the bottom of the hem.

Here’s the lower front once altered. The right shows the original Y cutting line drawn in, tapering out to BB.

This is the front inset panel. Again, the right side shows the original Y cutting line drawn in. (The left is just me drawing in the stitching line when trying to figure out how to add the extra amount.)

Here’s the pocket piece. You can once again see the original cutting line drawn on the right. The pocket piece is actually the same for all adult sizes, but since I was going between sizes I needed to add extra room on the right. (Once worn I also found the pocket piece too narrow for my taste, so for next time I widened it 2”, that’s the middle alteration. That’s what is going on in the middle of the piece.

Construction

As usual with the newer Jalie patterns, I found the instructions were excellent (and I believe a video tutorial is also on their website). The hardest part is probably Step 10, getting the inset lined up with the lower front (since the pockets are tacked together at the very top and very bottom of the slash.)

I think in the future I would consider adding in a zipper to the front pockets, just for some extra security while at the playground.

I found the finishing where the hood attaches to the zipper very neatly done.

I do recommend tracing piece C1/C2 lower front and lower back) twice. One to attach to the upper back piece, and one so you can avoid having to take the extra step to cut the piece off indicated by the instructions in Step 5 after cutting the entire hoodie. Just eliminates more room for error.

Conclusion

A great hoodie pattern, especially for layering! It is perfect for my casual stay at home mom to a toddler life. I do recommend checking the width of the front pockets though because they seem on the narrow side, and while they work fine for hand warming I would like the ability to more securely store my keys, phone, etc when out and about. As you can see below there’s plenty of room to extend the width towards the center front.

Ottobre 1/2024 #2: Velour Bear Hoodie and #3: Velour Pants

This was unfortunately the best photo I could get of him wearing the set…he’s not the most cooperative child and would not stand still while facing me.

I have been wanting to make this for my son since I first saw it when the issue came out nearly two years ago. About two months ago I finally got around to it.

Pattern Background

The velour hoodie has a half zip front with a bear face applique. The bear has little ear and paw pieces that are sewn in. Sizes are European 62-92.

The slim leg pants have an elastic waist and front pockets. They come in sizes 62-92. Velour is recommended for them as well, though I think they’d be great out of a jeggings denim or stretchy French terry.

My son is currently a 92 so this fall was my last chance to make it before he grew out of it forever!

Fit/Alterations

For the hoodie I added a total of 2” width to the bottom at the hem. For the pants I added 1/2” to the center back crotch curve at the top. These alterations are mostly because he wears cloth diapers and needs extra room there.

Materials

I used cotton velour knits from Nature’s Fabrics for the hoodie, bear face, and both pairs of pants. For the face and lining of the ears and paws I used single knit cotton jersey, also from Nature’s Fabrics. I’m not entirely sure where I got the ribbing for the cuffs, hem band, and hood binding…it was probably also from Nature’s Fabrics but Fabric Mart is another possibility.

For the applique stitching I used Simthread embroidery thread from Amazon. If you buy this thread, make sure you check off the coupon to save yourself $7!

The zipper is a #3 molded plastic YKK zipper from WAWAK.

Construction

I have almost no experience with applique, and found the bear face finicky and time-consuming. Ottobre has you iron fusible knit backing to a piece of single knit and then cut out the eye, eyebrows, and mouth/nose pieces from that. I also added an iron-on tear-away stabilizer to the back of the brown bear head before doing the applique. The pieces are extremely tiny and very tricky to place and stitch, especially since velour isn’t the easiest fabric to transfer markings to nor to applique. My applique work is not perfect (as I mentioned before I have pretty much no experience with applique and velour can be tricky for fine work) but hey, it’s for a kid that will outgrow it sooner rather than later.

The good news is that once you’ve done the face applique and little ears and paws, the hardest part of the hoodie is over. I did find the instructions for the zipper a little confusing, but basically you take a piece of velour, fold it over, and place the raw edge at the bottom of the zipper and the folded section facing up towards the zipper pull. This is what it looks like when finished:

The pants are super simple. I did most of it on my sewing machine, just using the serger to finish the edges and to attach the waistband. Before sewing the waistband in place I ran a three step zigzag along the inside upper edge to make sure the elastic wouldn’t roll during washing:

Conclusion

My son has gotten a lot of wear out of both his hoodie and pants. Velour is great for hoodies and pants – it is breathable, durable, easy to wash, and very easy to layer due to the smooth backing.