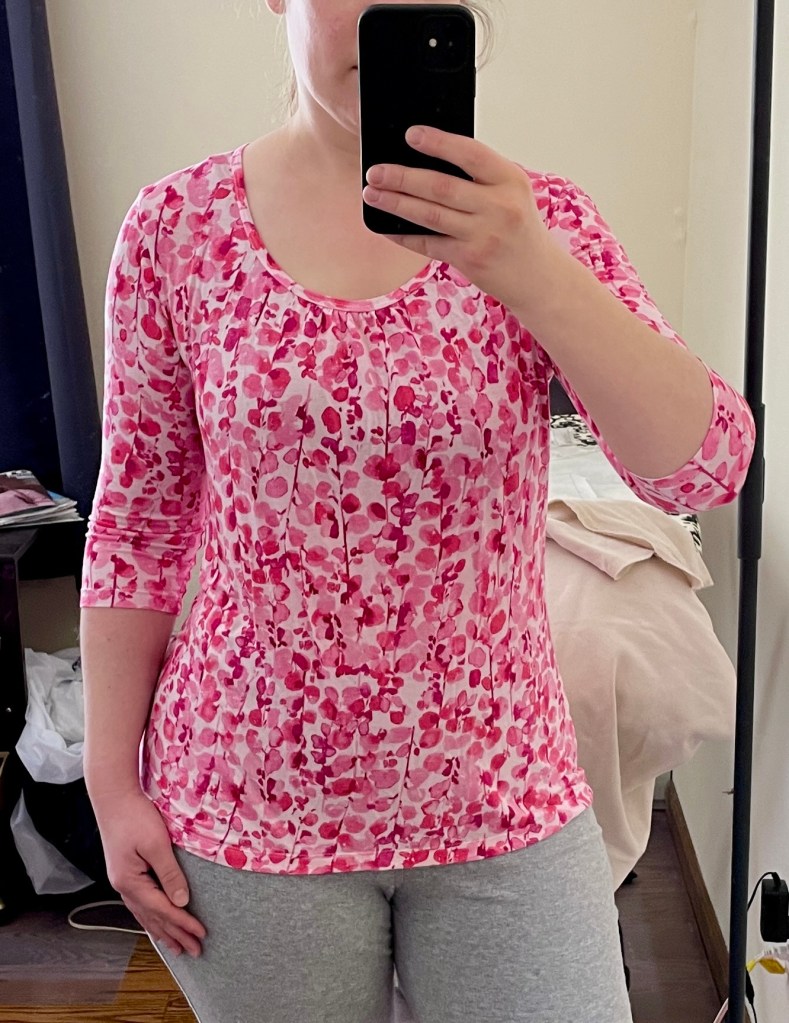
This fitted women’s t-shirt from Ottobre features a gathered scoop neckline and long sleeves. The fit is slightly looser than the other two t-shirt tops in this issue due to the front gathering adding extra ease. It comes in sizes 34-52.
Materials
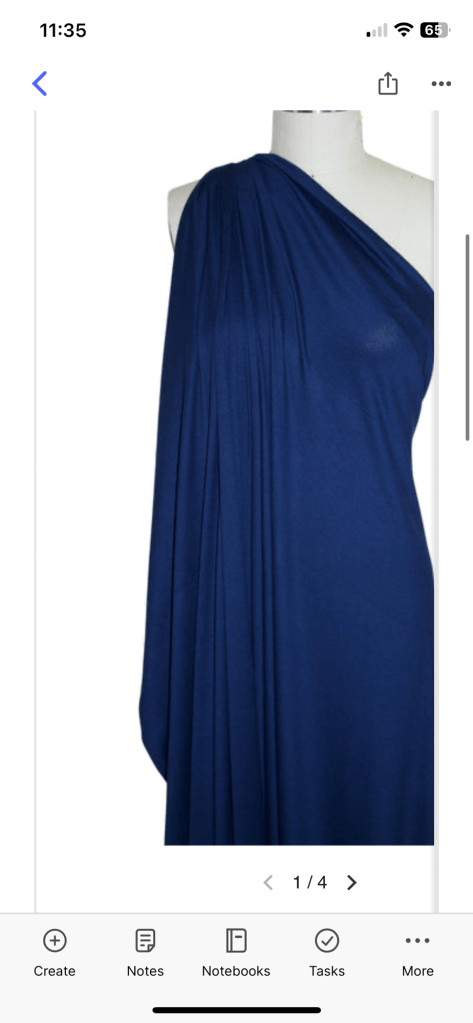
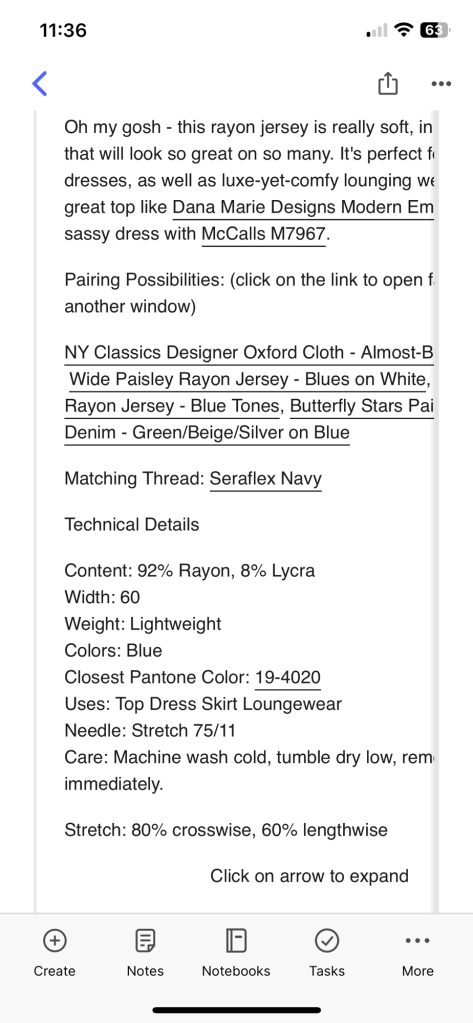
I used a lightweight, stretchy rayon/lycra jersey purchased a few years ago from Gorgeous Fabrics.
For the neckline gathering I used 1/4” clear elastic I found in my stash.
Fit
I cut a size 44. This was the first of the trio I made. I added about 4” to the hips. After making it I discovered the front upper chest was rather wide, so I narrowed it on subsequent versions.
I also found the length of both the body and sleeves really long. The sleeves were very tight around the elbows. When I went to hem the sleeves I accidentally hemmed the same sleeve twice, which is why I ended up with three quarter length sleeves!
Construction
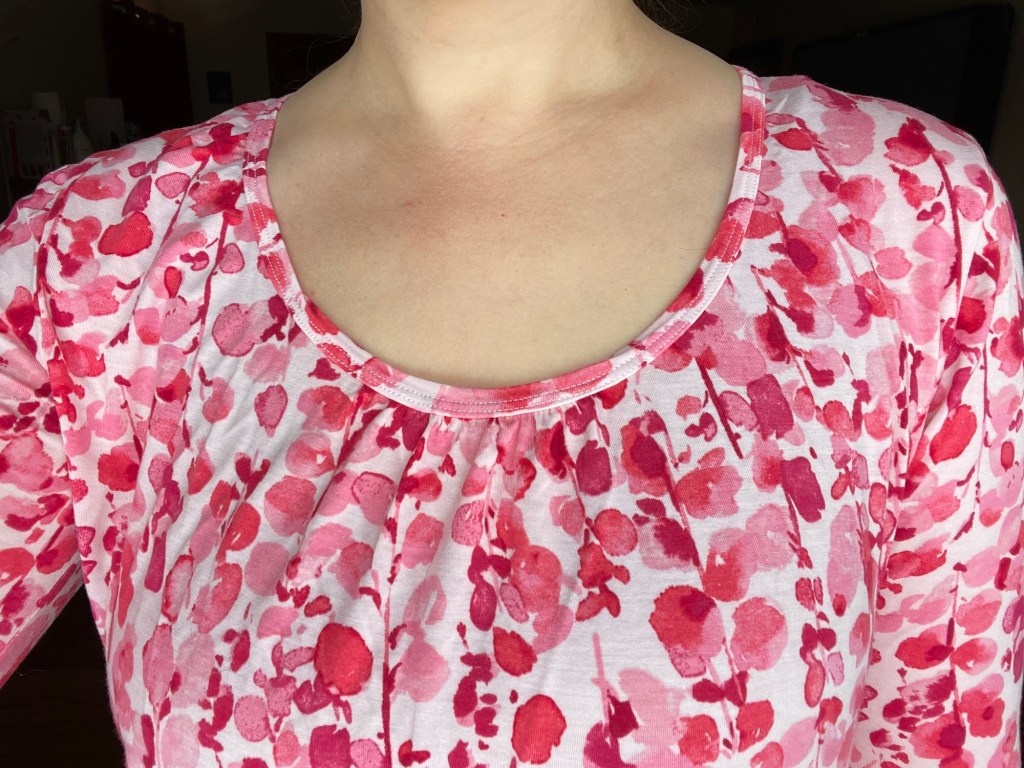
To gather the neckline you use clear elastic. I actually hate using clear elastic; the ultra thin 1/4” width elastic stretches into a skinny rope that’s almost impossible to stitch and the texture is sticky. I do have a heavier and wider elastic but it was packed away somewhere and I couldn’t find it at the time. (STILL haven’t finished unpacking after over a year!) once you gather the neckline though the rest of the shirt goes together quickly.
The neckline binding length is left up to you; I cut it 85% the length of the measured neckline and that seemed to work well for keeping it stable and snug.
Conclusion
Not sure if I would make this one again. I prefer the snugger fit of the other two tops in this issue. I do think it would make a nice shell for under a blazer though (if I ever wear one again!)
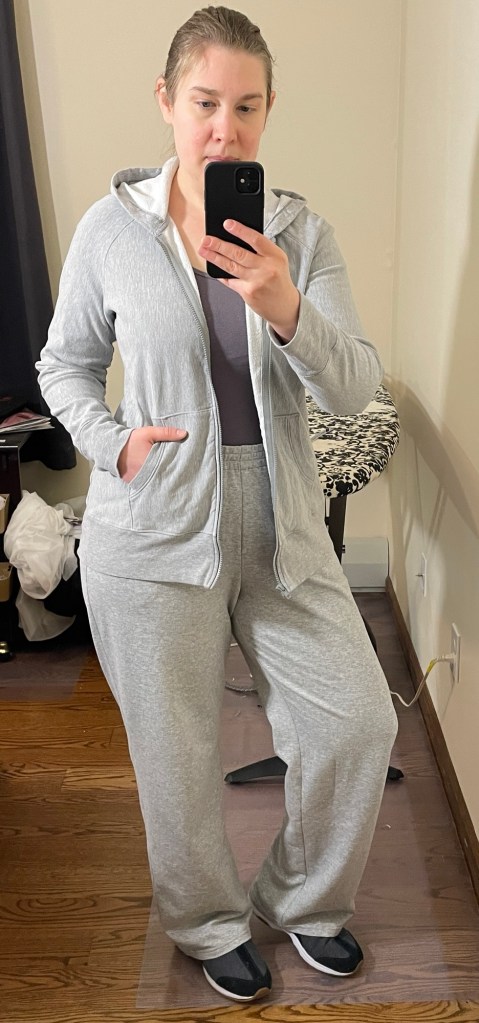
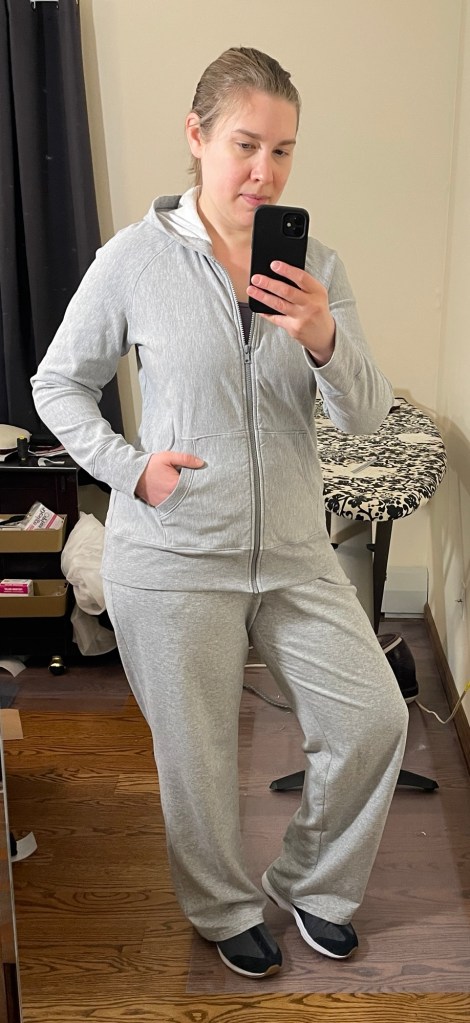
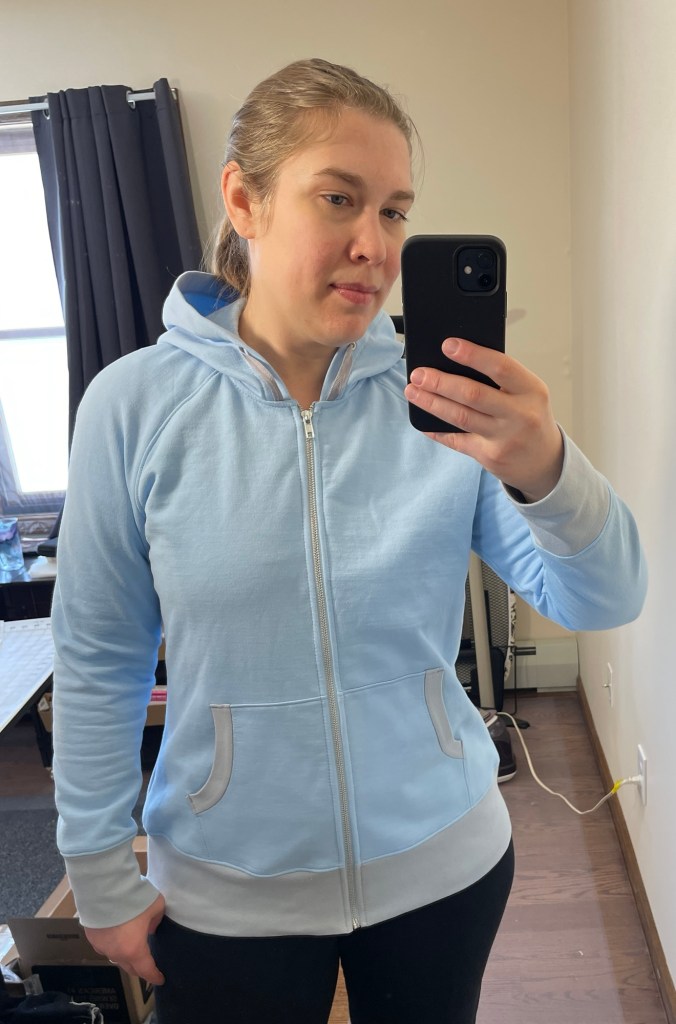
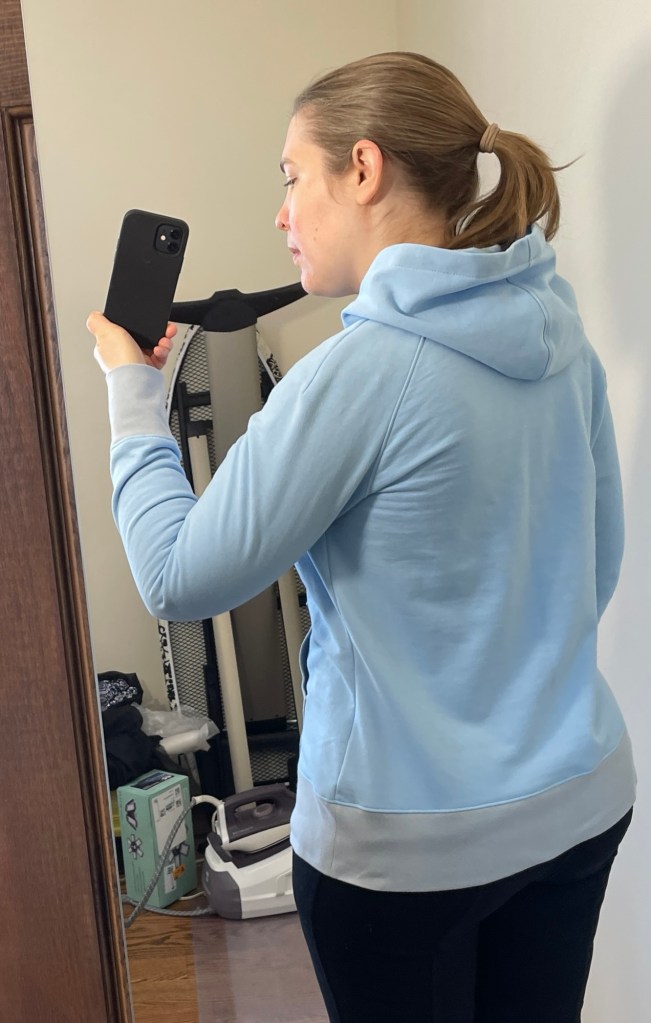
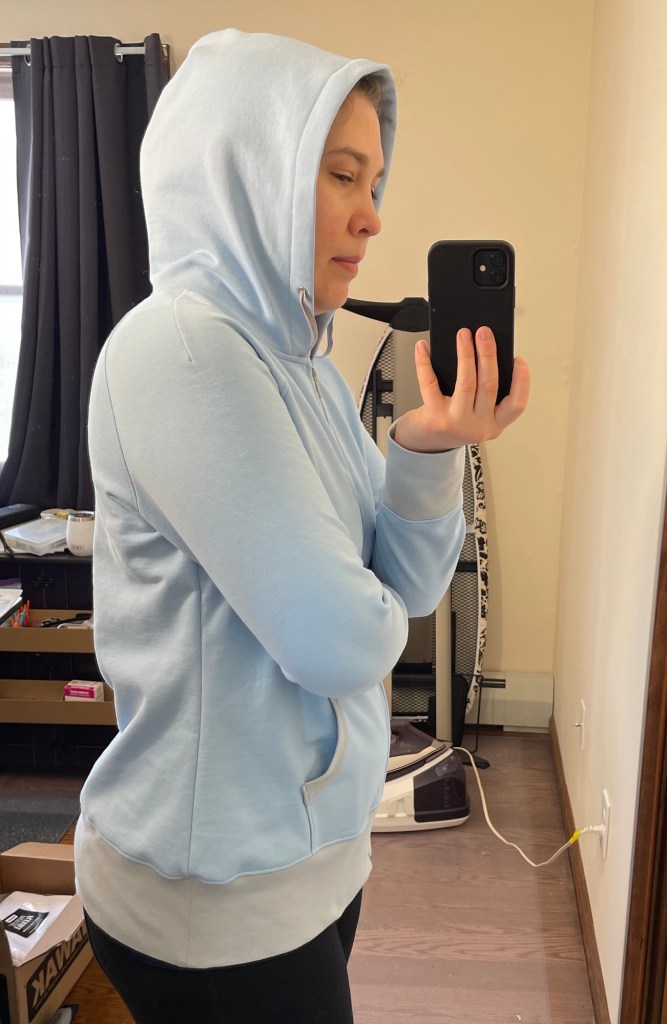
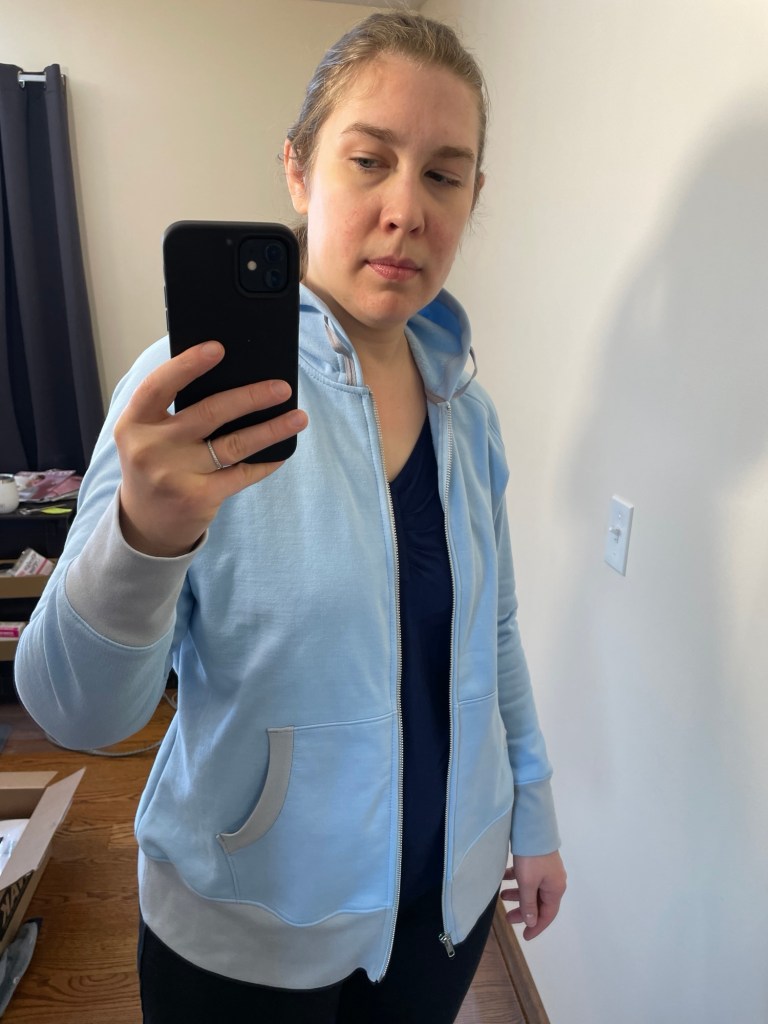
This time I made this hoodie out of a stretch bamboo fleece from Nature’s Fabrics. This fabric is so soft and cozy! The greater stretch is across the length, not the width, so I cut it against instead of with the grain. For the rib knit I used a gray heather bamboo/spandex rib knit which as you can see coordinates perfectly. Overall this is a much softer and stretchier version of my first hoodie.
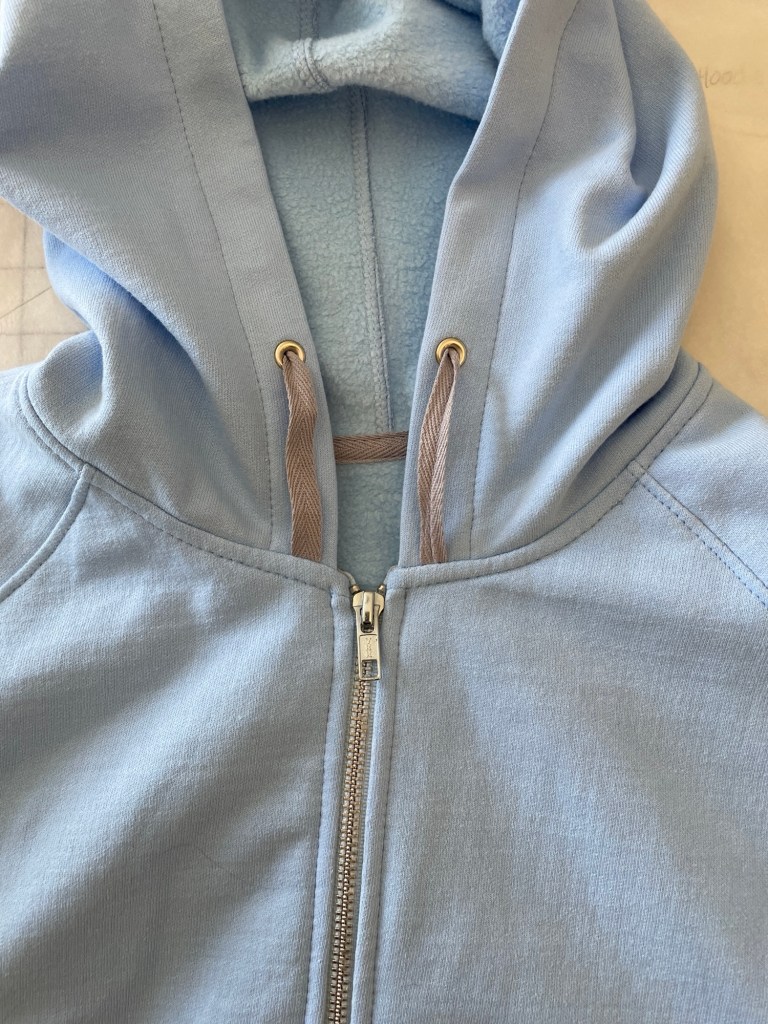
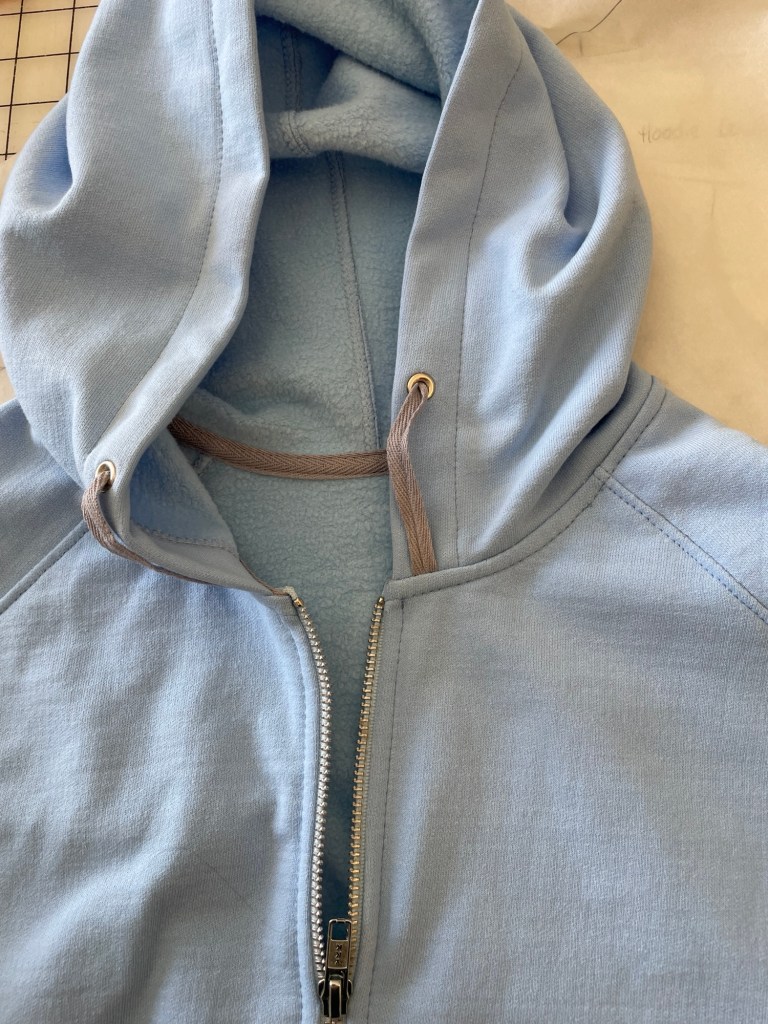
The zipper is a YKK #5 molded plastic zipper that was in my stash, likely from WAWAK/Cleaner’s Supply. I finished the hoodie neckline seam with twill tape from Amazon.
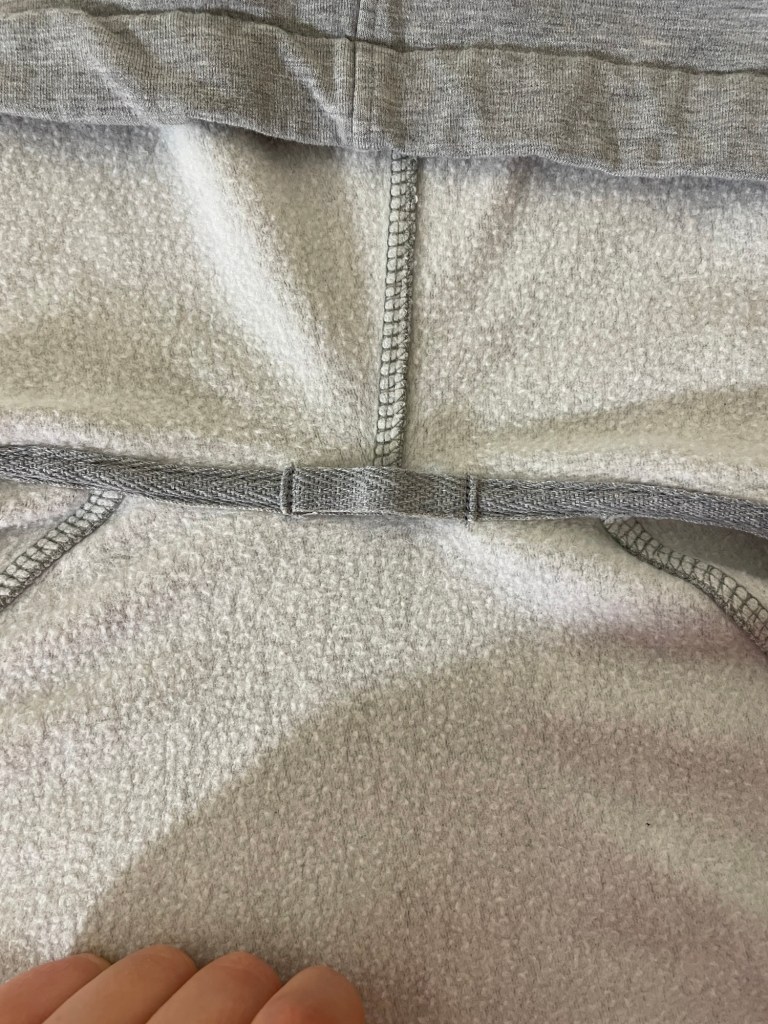
For this version I also added a hanging loop, as I noticed with my other hoodie that I needed to hang it up more than I anticipated.
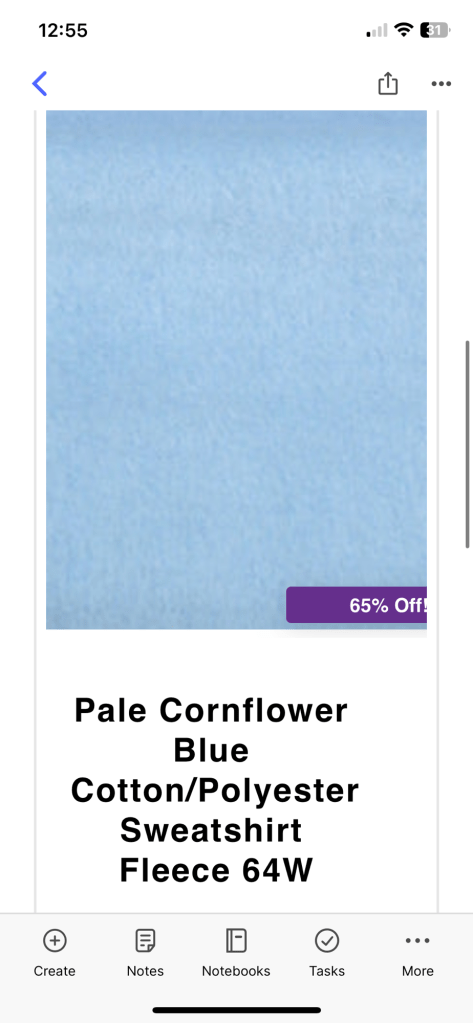
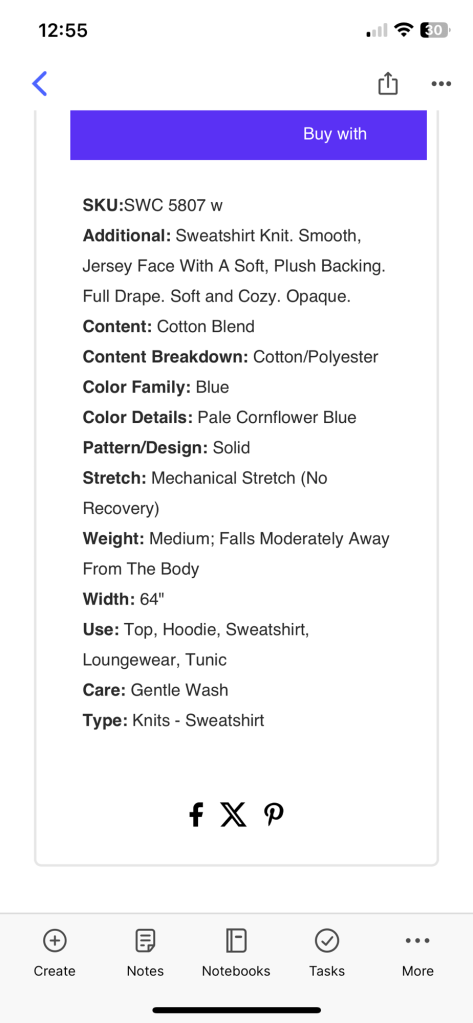
I have a gorgeous bamboo fleece from Nature’s Fabrics in my stash I want to use for this pattern, but since I wasn’t sure about the fit or construction I decided to use something less precious for my first version, a cotton/poly sweatshirt fleece from Fabric Mart. It has about 20% mechanical stretch. I would not go below that amount of stretch for this pattern.
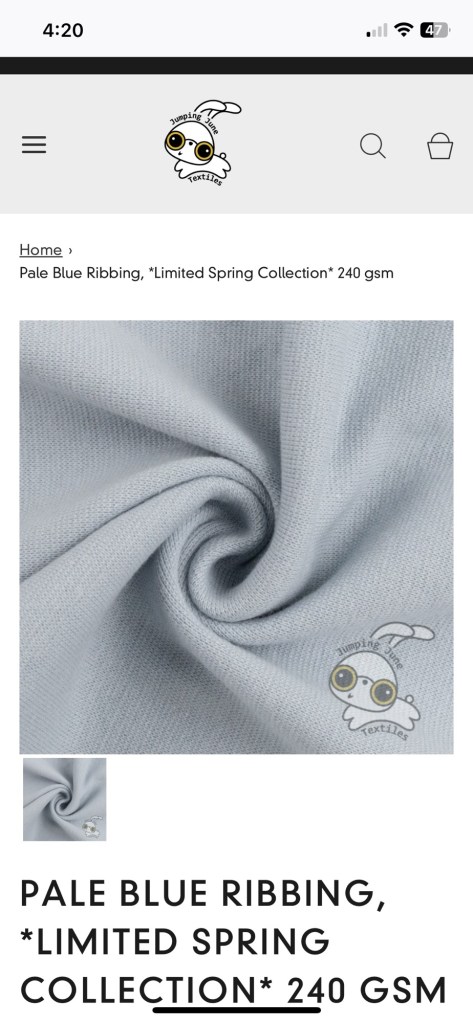
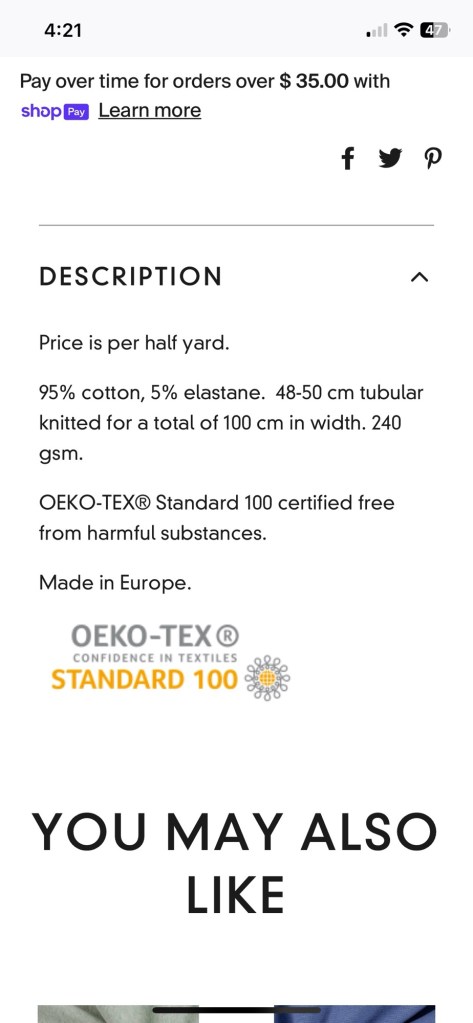
For the rib knit I used a pretty beefy rib knit from Jumping June Textiles. It ended up being lighter and paler in color than I had hoped for, but the quality is excellent.
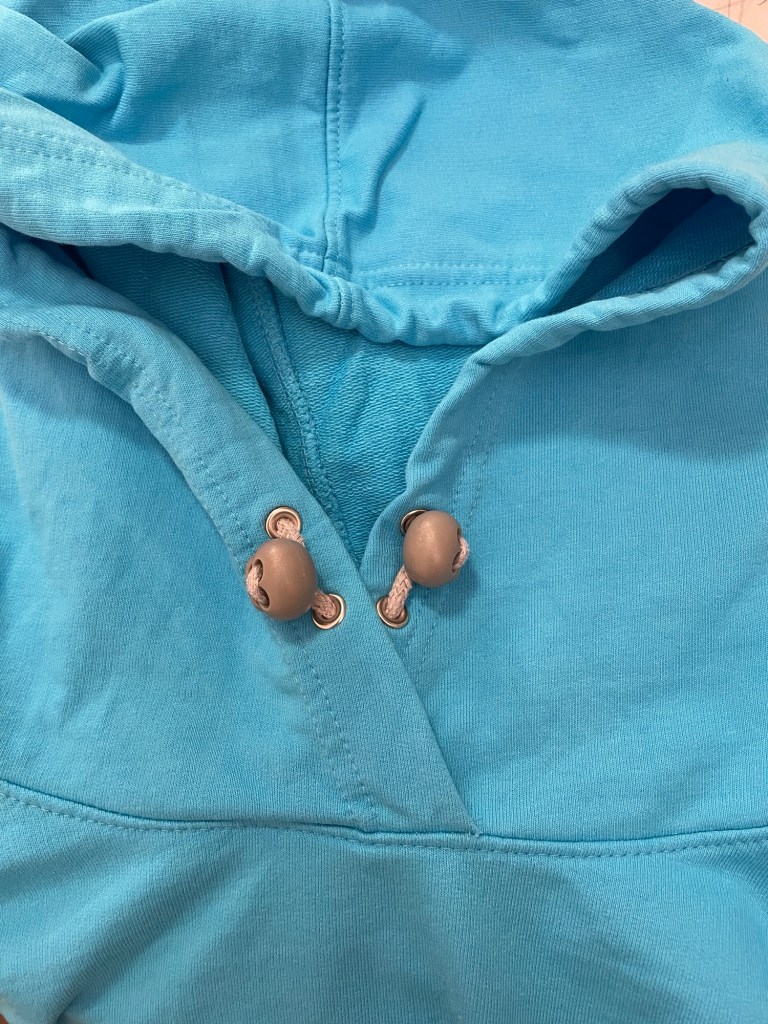
The zipper is a #5 YKK metal zipper from WAWAK. The hood grommets are #00 metal grommets, also from WAWAK. The twill tape used for the drawstring and to finish the seam attaching the hood to the rest of the hoodie is from Amazon.
Fit
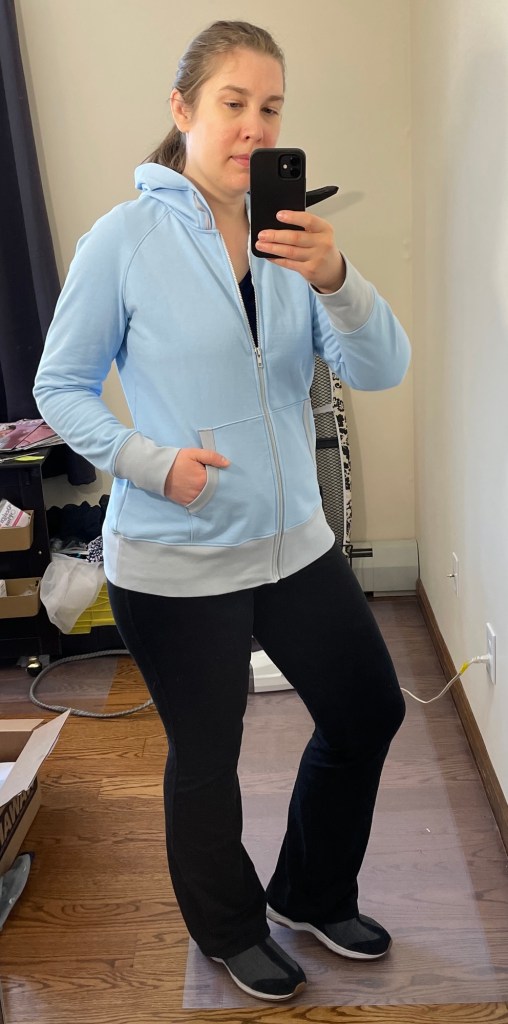
I cut a size 44 for most of the hoodie. For the hem band I cut a size 48. The hip of the hoodie where it meets the hem band is around a size 46. The hem band has negative ease so you stretch it to fit the hem of the fleece. I also made the sweatshirt length size 48 so I wouldn’t have to shorten my zipper.
I found the fit was spot on, though a bit on the snug side due to the lower stretch and lack of Lycra in my fabric. The sleeve and hem length were perfect for me. I didn’t know how I’d feel about the wide cuffs (about 3.5” wide) or wide hem (around 4”) but I like them! When I’m working in the kitchen I can just flip up the cuffs instead of pushing them up, and the hem band gives a good fit around my hips.
Construction
Ottobre instructions assume you’re using one of those cover stitch machines that does the faux RTW flatlock stitch. I don’t have one so I serged the edges together and any topstitching was done on my regular sewing machine. The seams were mostly sewn on my serger.
Once again when it came time to sewing on the pockets I used the Design Plus fusible web tape from The Sewing Place. It makes it SO much easier to do any sort of topstitching for tabs, pockets, etc when working with knits.
I should also mention the PDF download layers the pattern pieces onto the paper (much like the pattern sheets do) and no seam allowances are included. I actually prefer this as it’s less sheets to tape together and it forces me to trace onto tracing paper rather than take a shortcut and put the paper pieces directly onto the fabric.
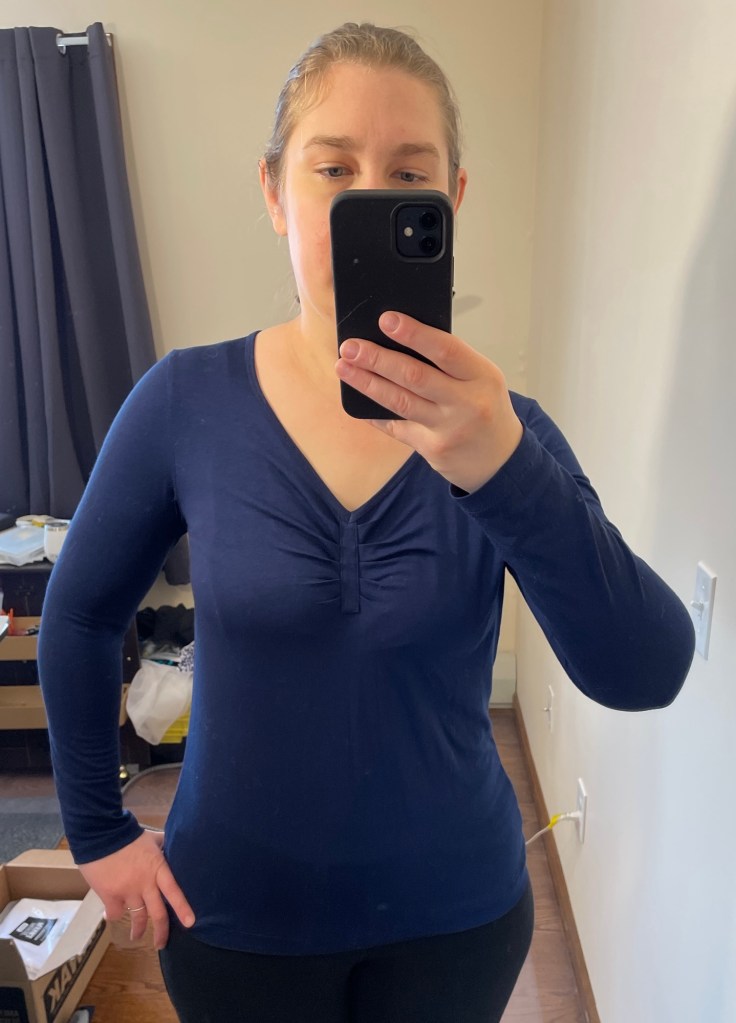
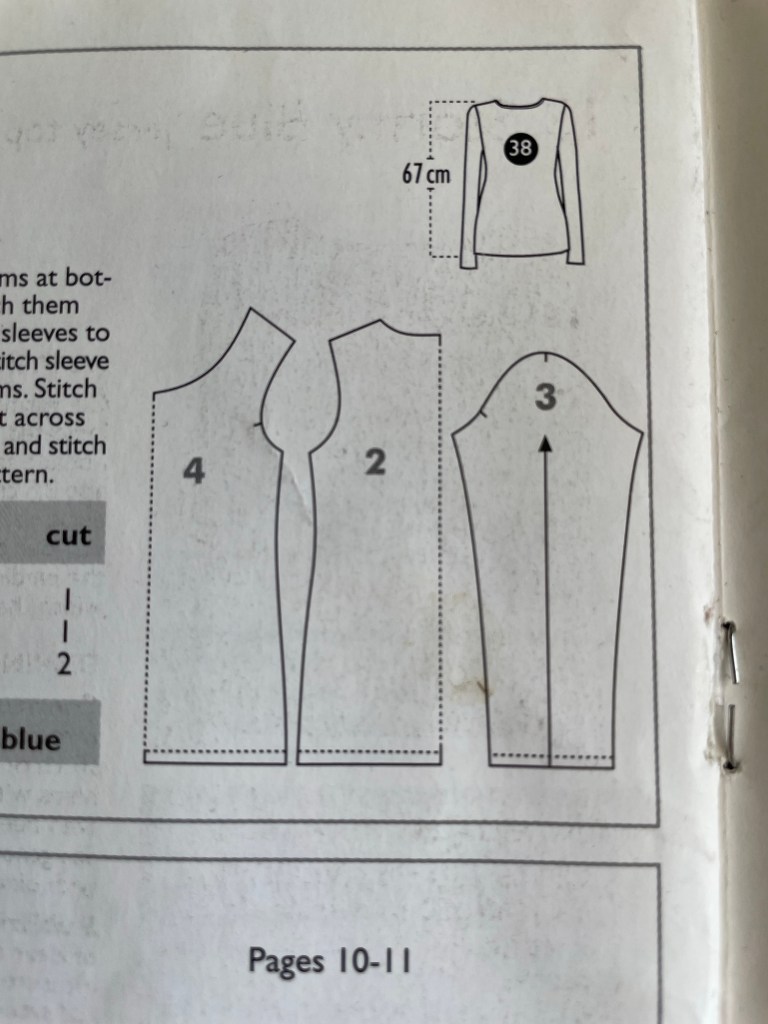
Ottobre 5/2012 #11 is a fitted v-neck tshirt with long narrow sleeves and pleats at the bust held in place with a self fabric tab. It comes in sizes 34-52 which is standard for Ottobre.
I had been admiring this pattern ever since I first saw it in 2012!
Materials
Ottobre’s sample was made from a viscose/lycra jersey with 30% stretch. No indication of it was 4-way or 2-way stretch.
I used a very stretchy rayon/lycra jersey from Gorgeous Fabrics.
Fit
I made a size 44 and added 4” to the hips. Based on my previous experience with the two other t-shirt patterns in this issue (which use the same block) I made the next few alterations:
Took in the upper chest 3/8” by doing a narrow shoulder alteration and easing in the back shoulder seam into the front. I feel like the upper chest ran wide on this pattern, but this also could have been my very stretchy fabric.
The length is LONG on this pattern. I shortened the sleeves 1.25” and trimmed off 1.5” from the body hem.
The sleeves were quite tight, especially around the elbow area. If you look at the pattern pieces the sleeve actually curves in at the elbow, instead of going in a straight line. I cut the sleeves in a straight line.
Construction
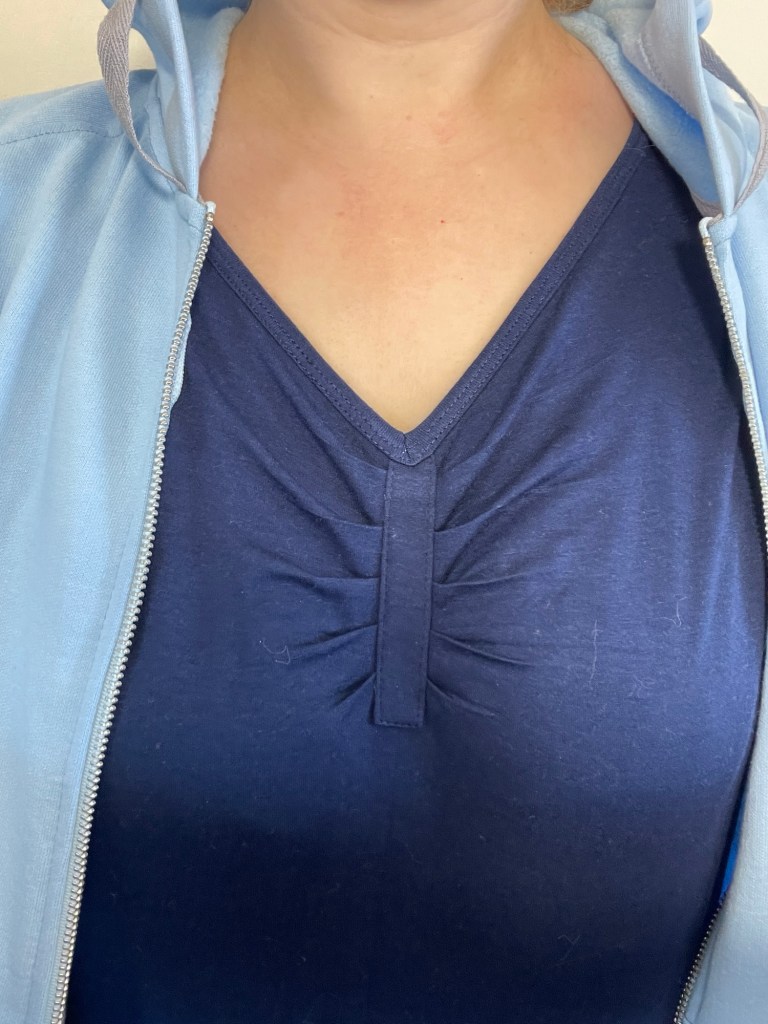
I love how this top looks, but the construction was a huge pain in the butt.
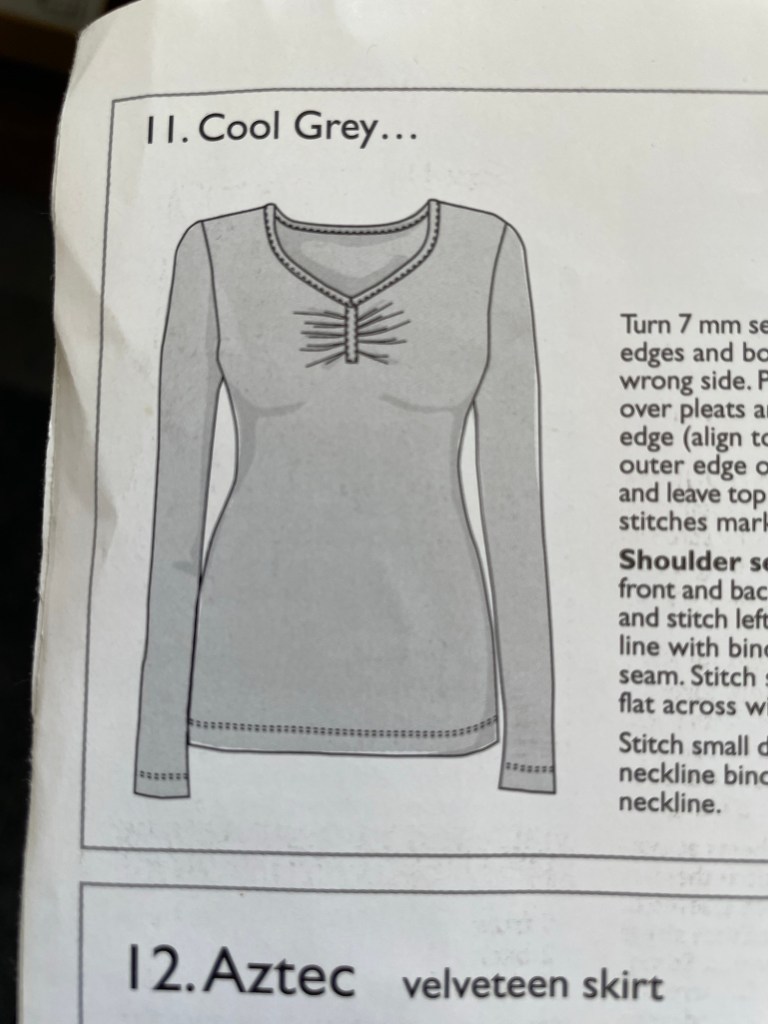
The neckline is beautiful but it took me several tries to get it right. This fabric is thin and stretchy and wiggly and unforgiving. The pattern doesn’t include markings for the front neckline pleats. You’re supposed to arrange them yourself based on how it fits. I just took a guess and made about five 1/4” wide pleats. I then faced a lot of issues with getting the front tab stitched in place in a way that looked professional and not wonky. I was not going to let it defeat me. I finally got it to work by doing the following:
Interfaced the front tab with a lightweight interfacing.
Once I secured the pleats in place with a row of stitching at the center front, I took a piece of iron-on tear-away stabilized and fused it to the wrong side.
I attached double-sided fusible web to the wrong side of the tab, then fused it to the center of the pleats before stitching.
All three of these steps FINALLY got me an evenly stitched front neckline.
It took me a few tries but I also finally got the v at the front neckline stitched more or less evenly as well.
Ottobre doesn’t give a measurement for the front neckline binding. Based on my fabric stretch I cut it to 85% of the length of the neckline.
Once the front neckline was finished it was super easy to construct the rest of the top. I’ve made all three of the t-shirts in this issue and this is my favorite view, even though construction of the neckline is not the easiest. I love it both worn alone and under my new Ottobre hoodie!
Finally managed to take some photos for this post while my husband was giving our toddler his bath tonight…
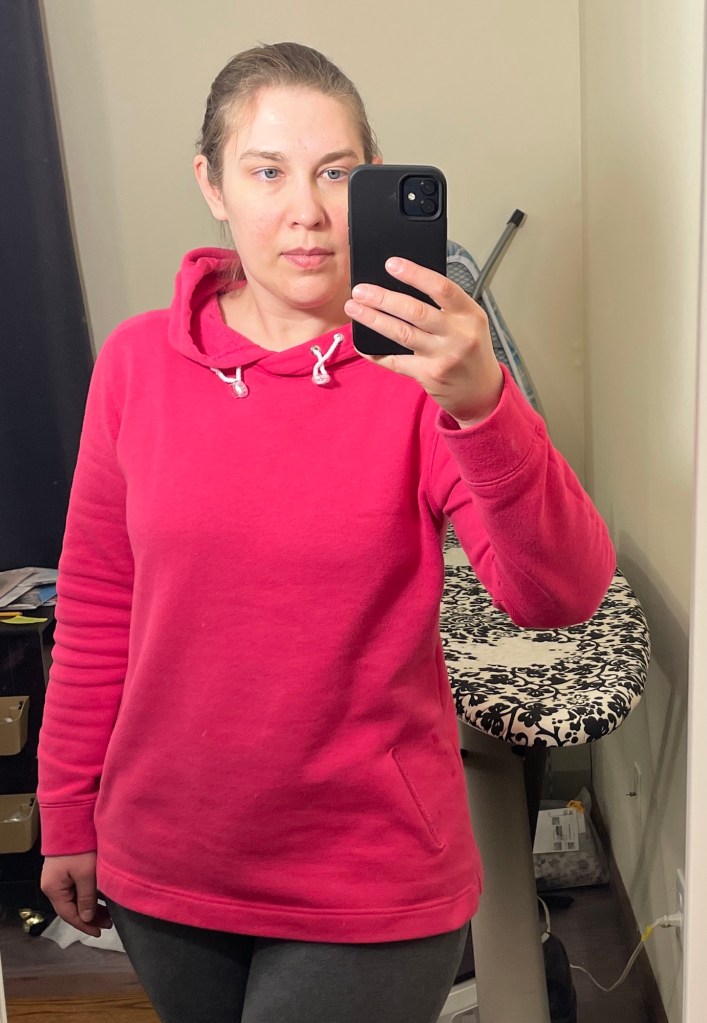
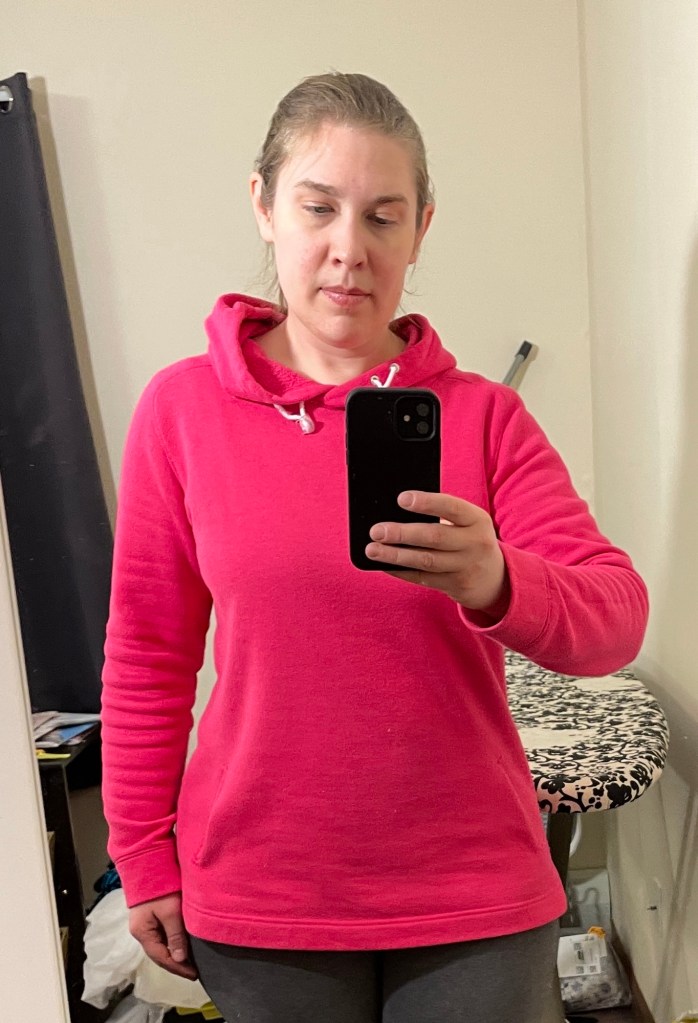
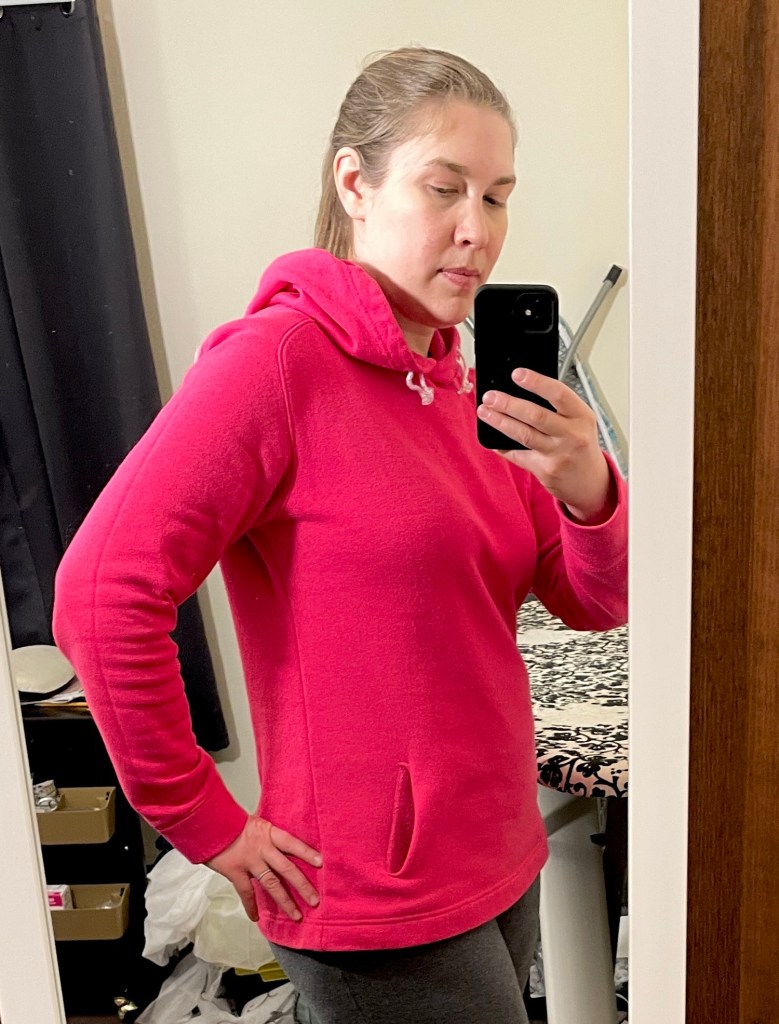
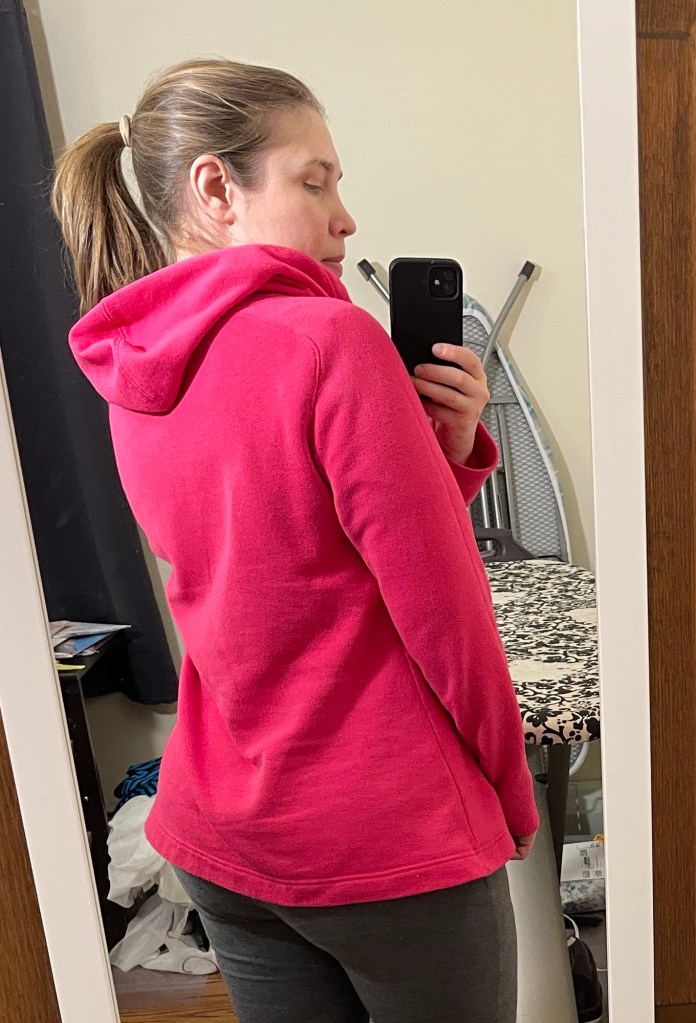
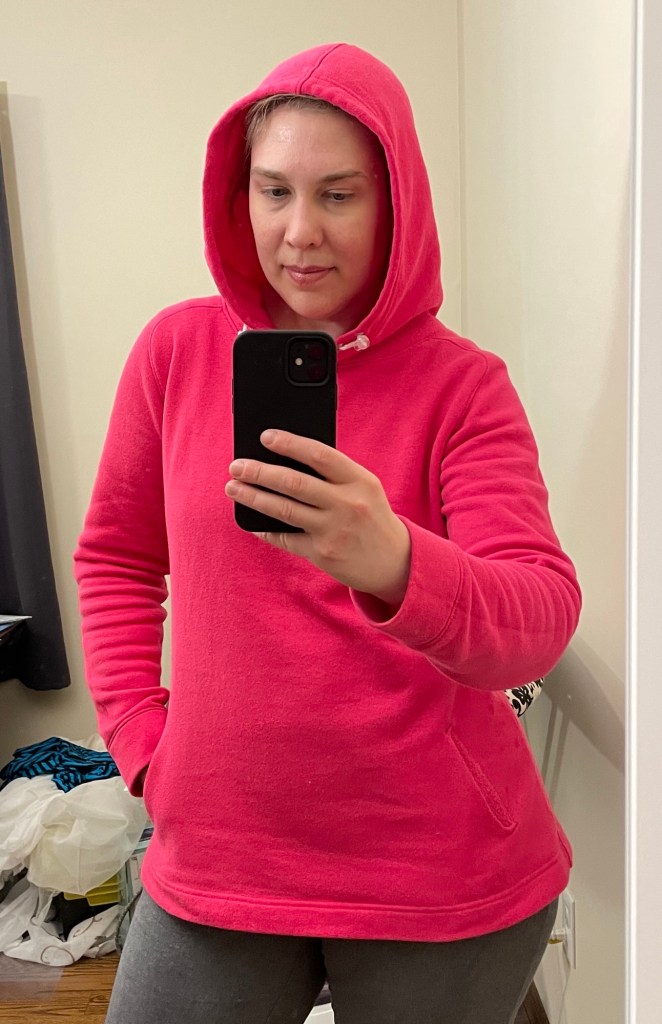
Version 1: hot pink cotton/polyester sweatshirt fleece
Version 2: lightweight baby pink cotton/lycra French terry
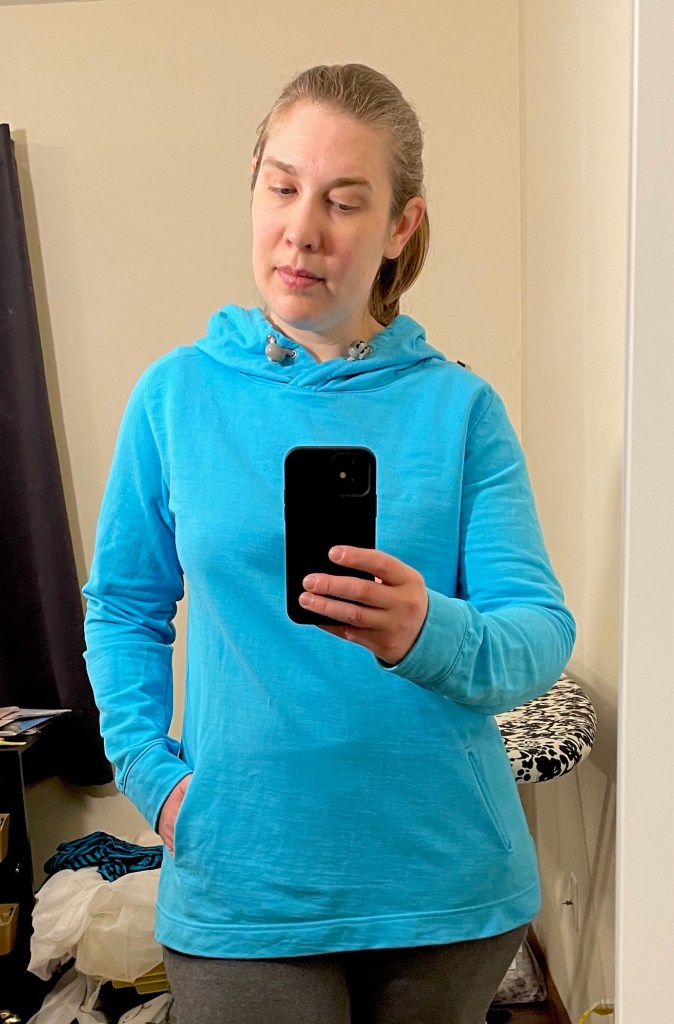
Version 3: Bright cerulean blue cotton/polyester French terry. Heavier and less stretchy than the first two.
Background
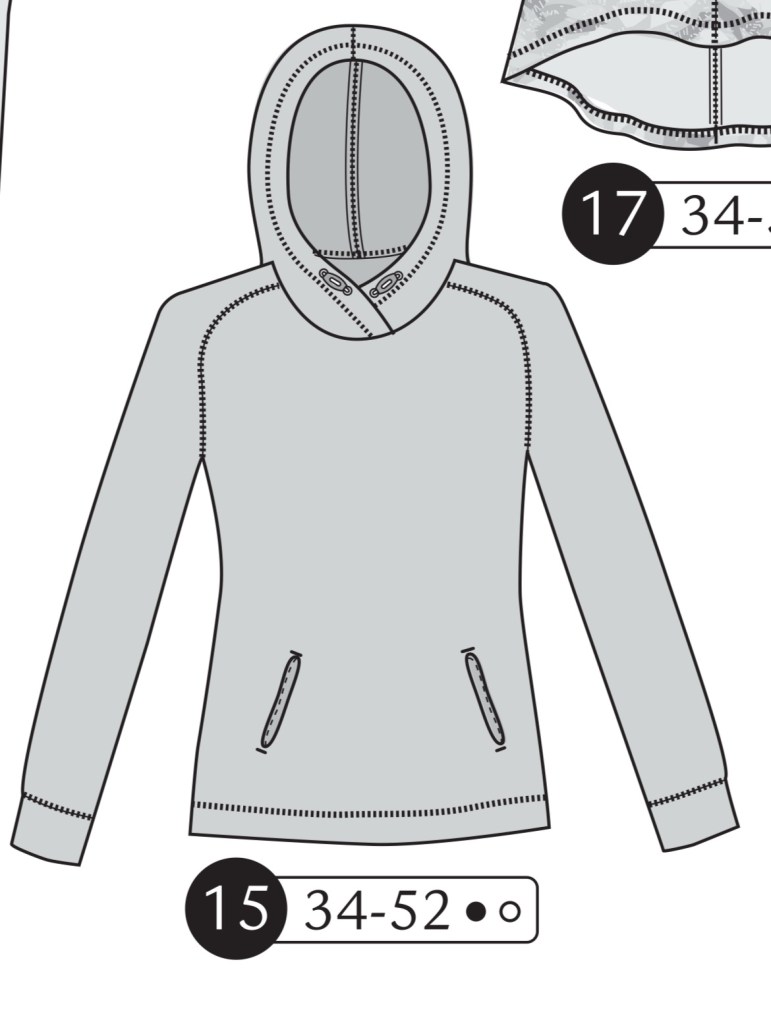
This women’s hoodie pattern features front slash pockets, saddle sleeves, and a hood with a mostly concealed drawstring and cord locks/stops. It is slightly fitted and drafted for heavier knits with about 15% stretch. The pattern includes sizes 34-52.
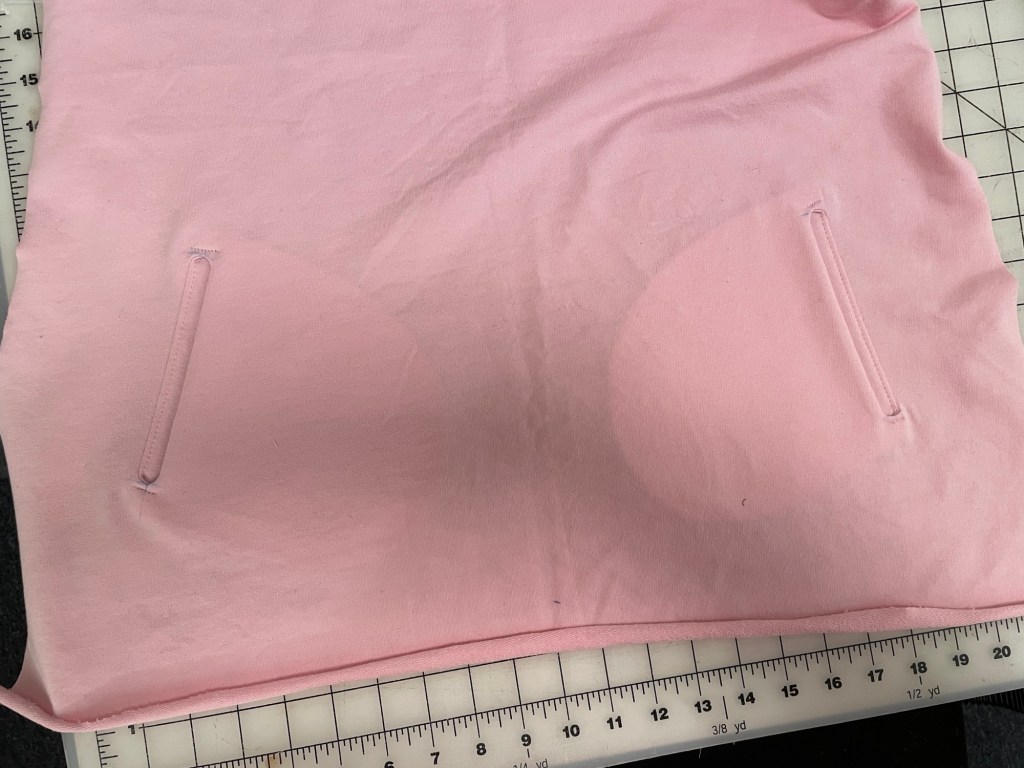
What I like about this pattern is there’s no need to find a coordinating ribbing for the cuffs or bottom band, as the sleeve cuffs are self fabric and the bottom is just a simple turned up hem. (I’m sewing a lot of sweatshirts, sweatpants, and various other knit items for my son and husband as well as myself now, and finding coordinating ribbing is always a challenge.)
I also like the front pockets. Since there’s no closure I wouldn’t trust them to securely hold something for extended amount of time when I’m out and about, but they’re very convenient for warming my hands or stashing my keys/phone when I need my hands free for a moment.
Another thing I like is the hood is DEEP. My son loves to play with my my hair way too much so these days I usually have my hair in a ponytail. Most hoodies, either RTW or home sewing patterns, are drafted for wearing hair down. I was pleasantly surprised to see that this hood fits perfectly when I am wearing my hair up, which makes sense as they suggest using this pattern as activewear and most women with longer hair will be wearing it up while exercising. The drawstring helps with making sure everything stays in place when the hood is worn. Ottobre doesn’t produce the sexiest patterns out there (for that you need to look at Marfy or Burda) but they do excel at offering comfortable, thoughtful, well designed basics for everyday life in a wide range of sizes.
Materials
For my first version I used a paradise pink cotton/polyester sweatshirt fleece I purchased last year from Fabric Mart. I would call it a mid weight fleece.
For my second version I used a light to medium weight baby pink cotton/lycra french terry I purchased ten years ago from Fabric Mart.
For my third version I used a heavier weight cotton/polyester French terry purchased recently from Fabric Mart. It has just a little mechanical stretch and while it is comfortable to wear, it is not as easy as the other two to get on and off.
For the drawstring for my first version I used cotton cording from Wawak. The grommets are also from Wawak.
The clear cord locks/stops were purchased on Amazon. I originally planned on picking them up from JoAnns but when I got there the price was $5 for two cord locks, and they only had navy in stock! Meanwhile I got a package of 30 on Amazon for only $7.19. They are not the strongest cord locks/stops but they are ok for this particular project.
For the blue version I used drawstring cord and cord stopper locks from Amazon. The drawstring cord is way nicer quality than the cording I used for my first version, and while bulkier the cord stopper locks are far more robust.
Alterations
Part of why I kept putting off sewing for myself is because I’m starting from scratch with sizing and alterations. I am about 25 pounds heavier than I was before having my son nearly 1.5 years ago. Based on my current measurements I picked size 44 and made the following alterations:
Added 1/2” to the body length. I also deepened the hem, making it 1.5” wide instead of the originally drafted 1/2”.
Removed 1/2” in width from the back waist
Added 2” to the hips. For my second version I added another 2”, to make it a total of 4”. This does correspond more closely to what my hip measurement is now.
I actually feel like I had to do less in the way of alterations than when I was size 38 or 40. The sleeves are a great length out of the envelope, the body felt like a good length, and I didn’t feel like the sleeves were too tight either around the bicep. The shoulders and neck seemed to fit fine too. I can comfortably layer a lightweight tshirt or tank top under it.
Construction
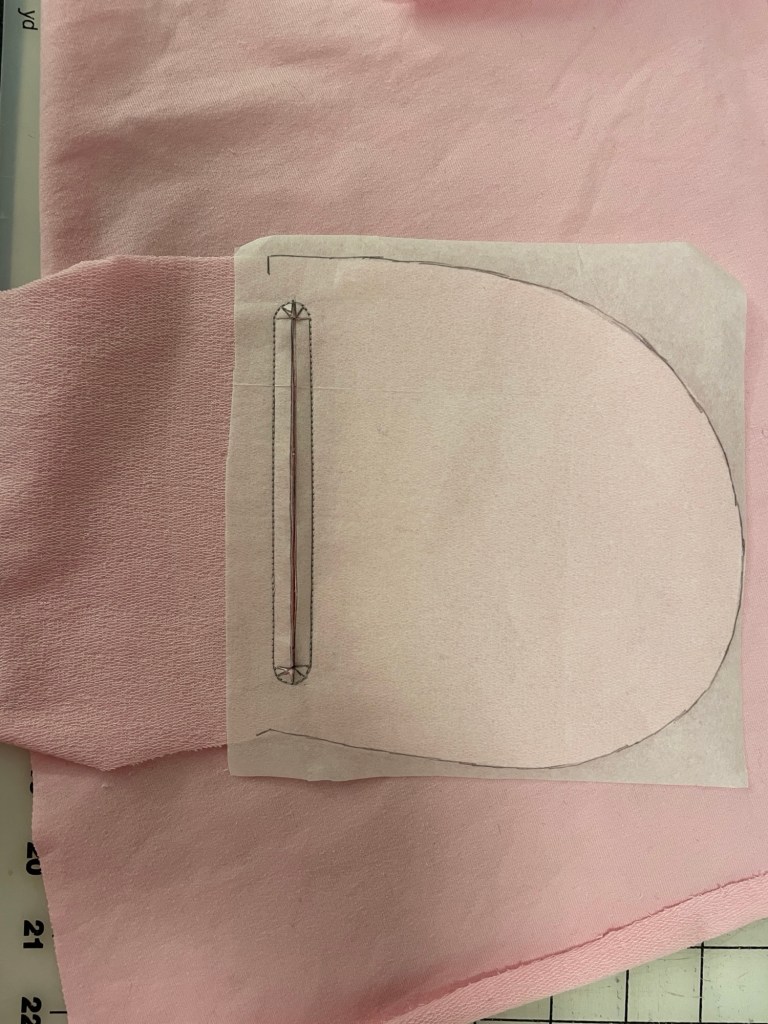
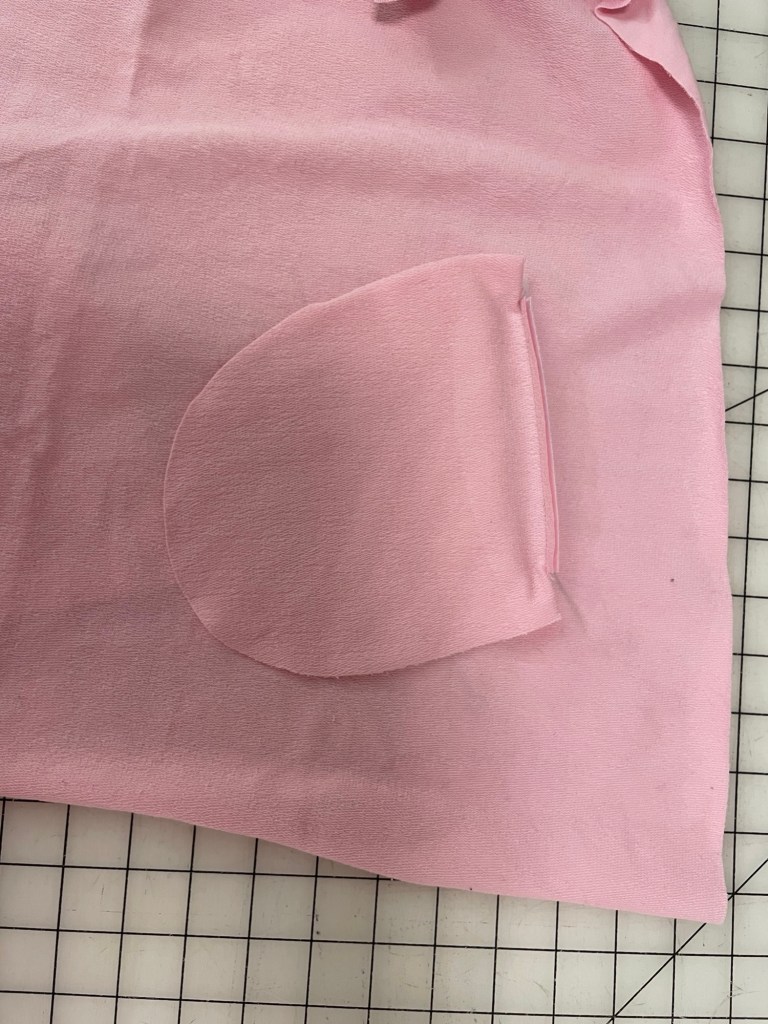
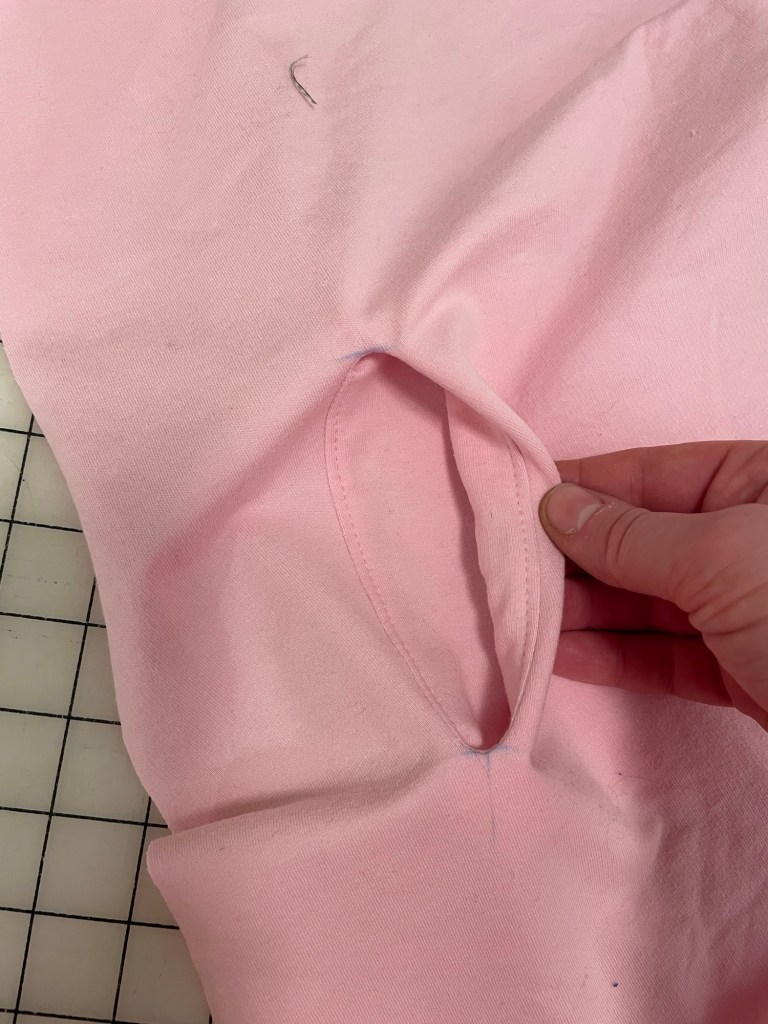
Pocket Tutorial
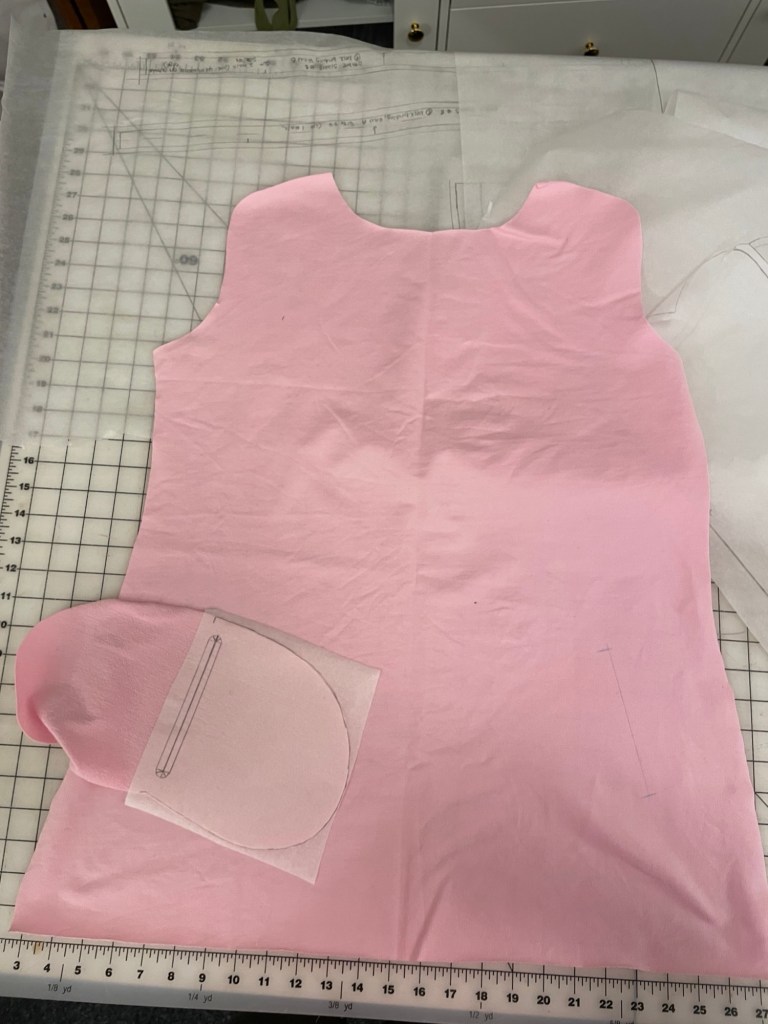
For the pocket opening Ottobre recommends making a template to help with stitching the pocket opening. I ended up using Sulky iron-on tear-away stabilizer on the side of the pocket piece with the opening. It made life so much easier, as it prevented stretching when being sewn and I had a precise pencil line to follow instead of a fuzzy chalk line.
When I made the pockets for my first version I decided I wanted the fleece side of my fabric to face my hands and not the inside of the shirt, as it is so soft and cozy. So when I constructed the pockets I made sure to have the fleece side against the right side of the front, and ironed the stabilizer to the smooth side. For my baby pink French terry version I ironed the stabilizer to the looped side (wrong side), and had the smooth side against the right side of the front.
You want to interface the wrong side of the front pocket slash. I used Design Plus superfine straight fusible stay tape, letting it extend about 3/8” beyond the dot of the slash marking.
One you have your stabilized pocket, position it so the templated side faces towards the center front, lining up the pocket template with the slash line of the front.
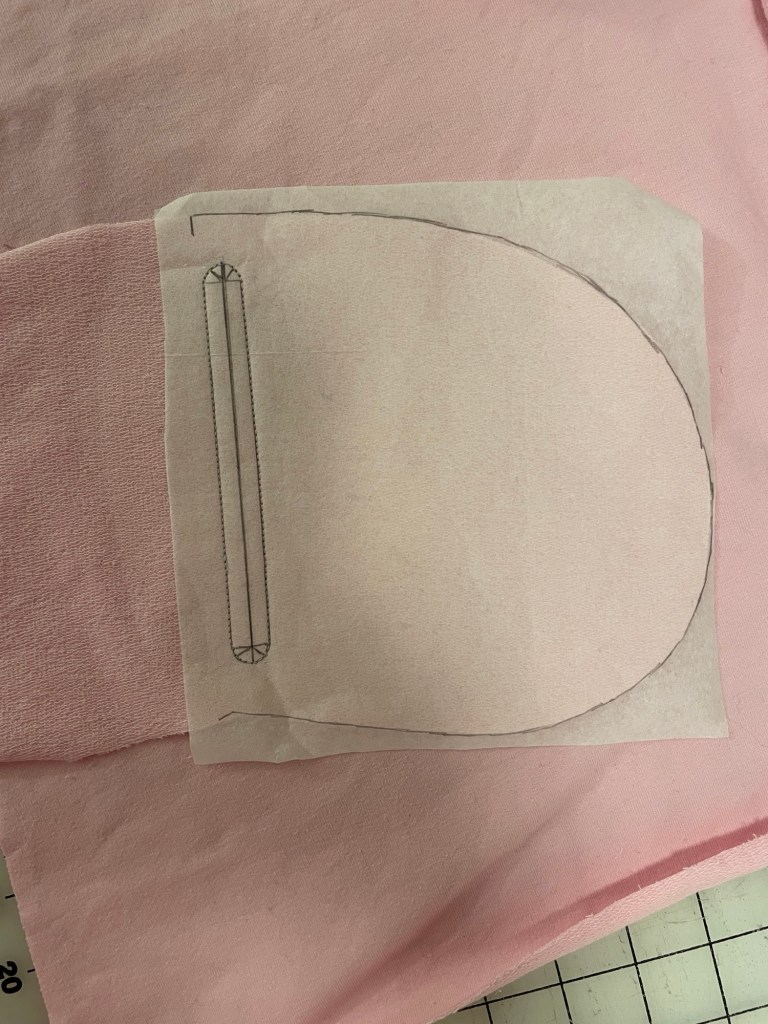
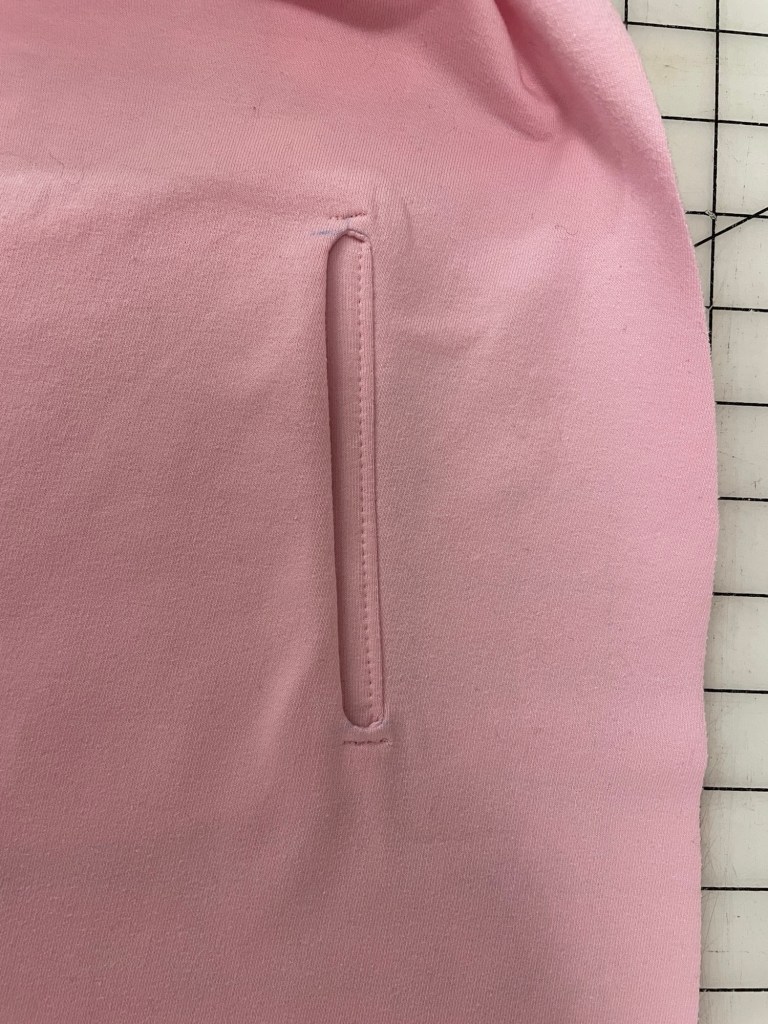
Carefully sew along the pocket opening marking. I turned the wheel by hand when it came time to making my way around the curved ends. precision is key here!
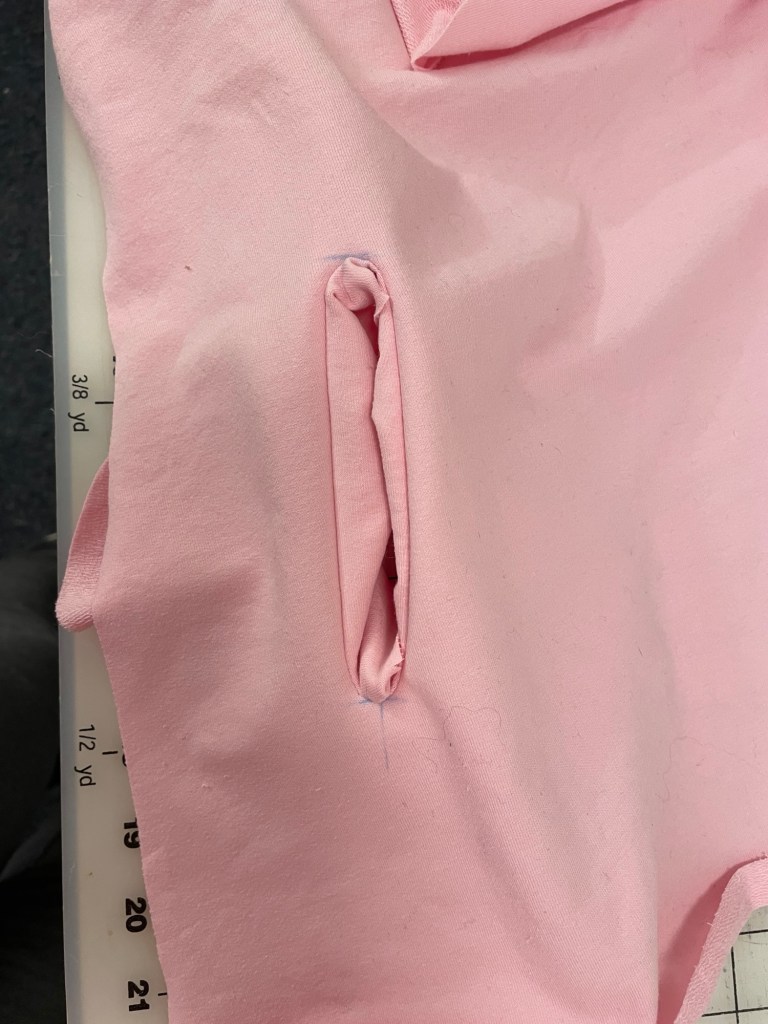
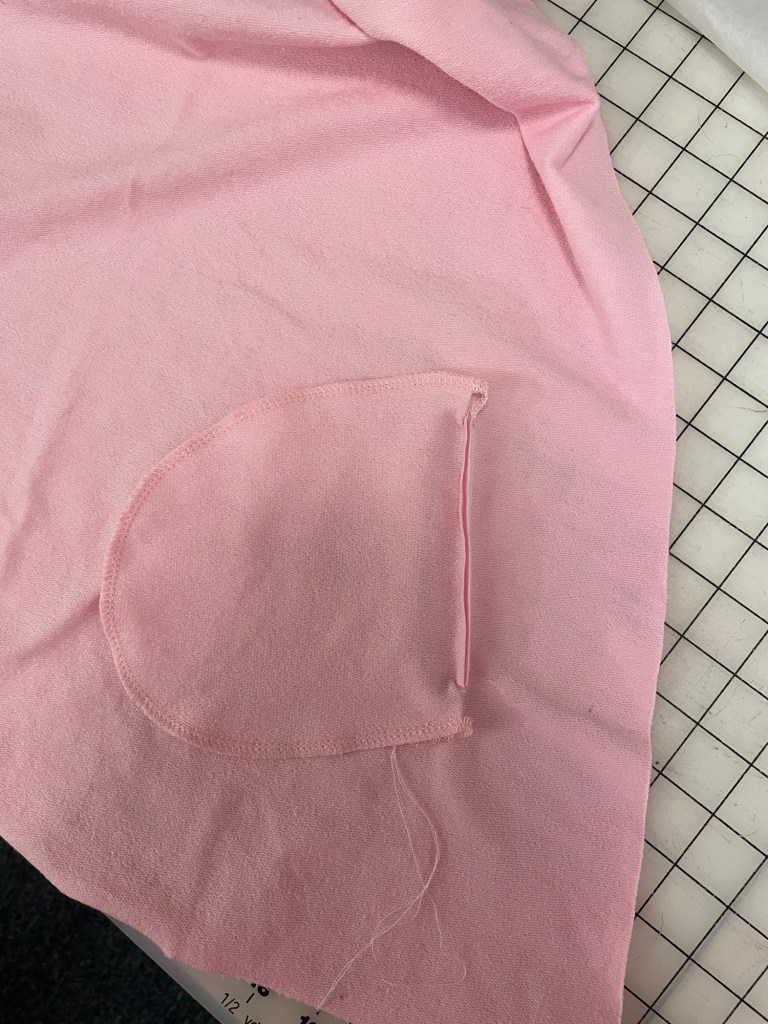
Now slash open the pocket, making sure to clip the markings at the curved ends. You want to get very close to the stitching (about 1mm away).
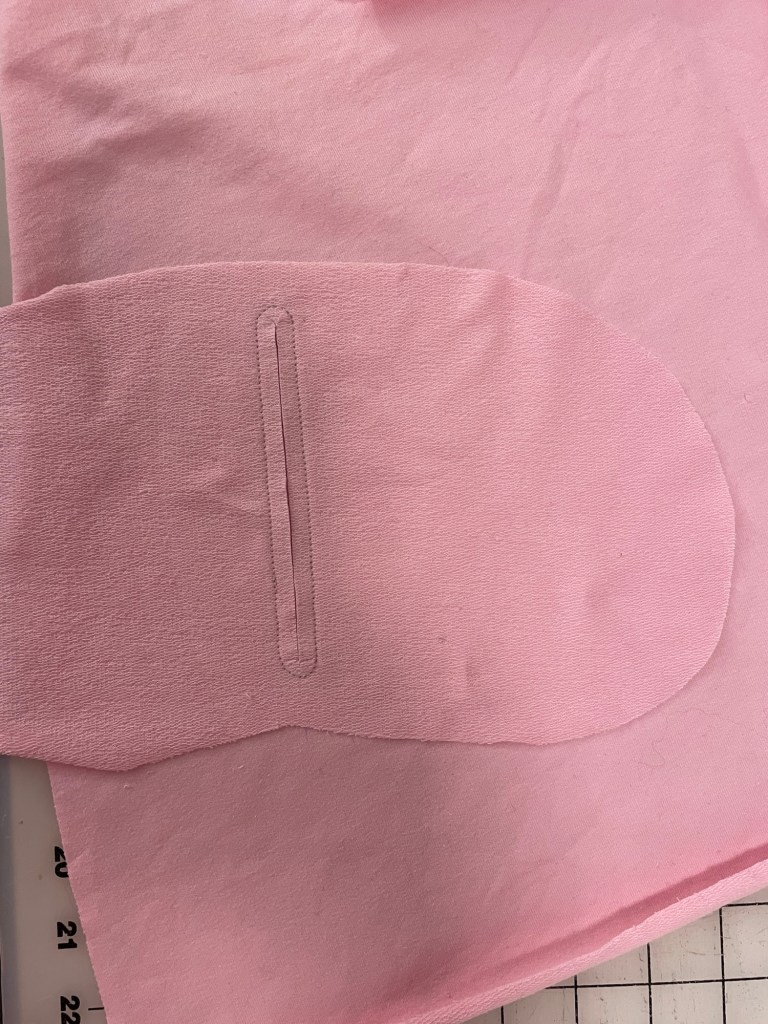
Now gently tear away the stabilizer.
Pull the pocket bag to the wrong side.
Right sideWrong side
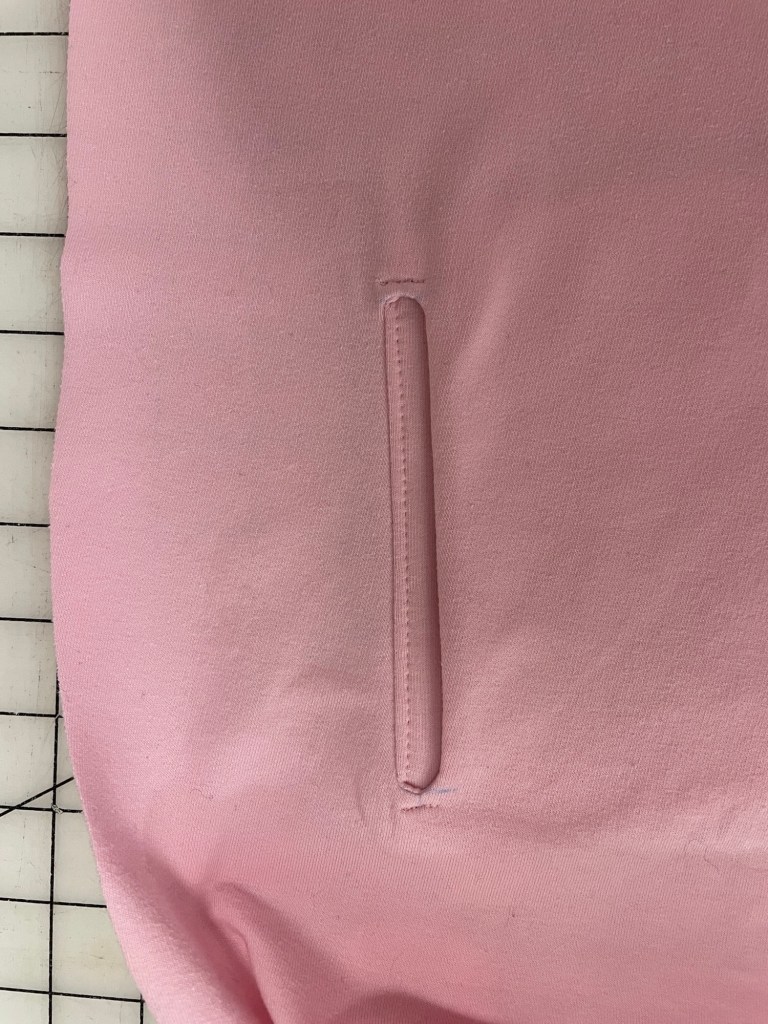
Serge/sew the pocket bag edges together.

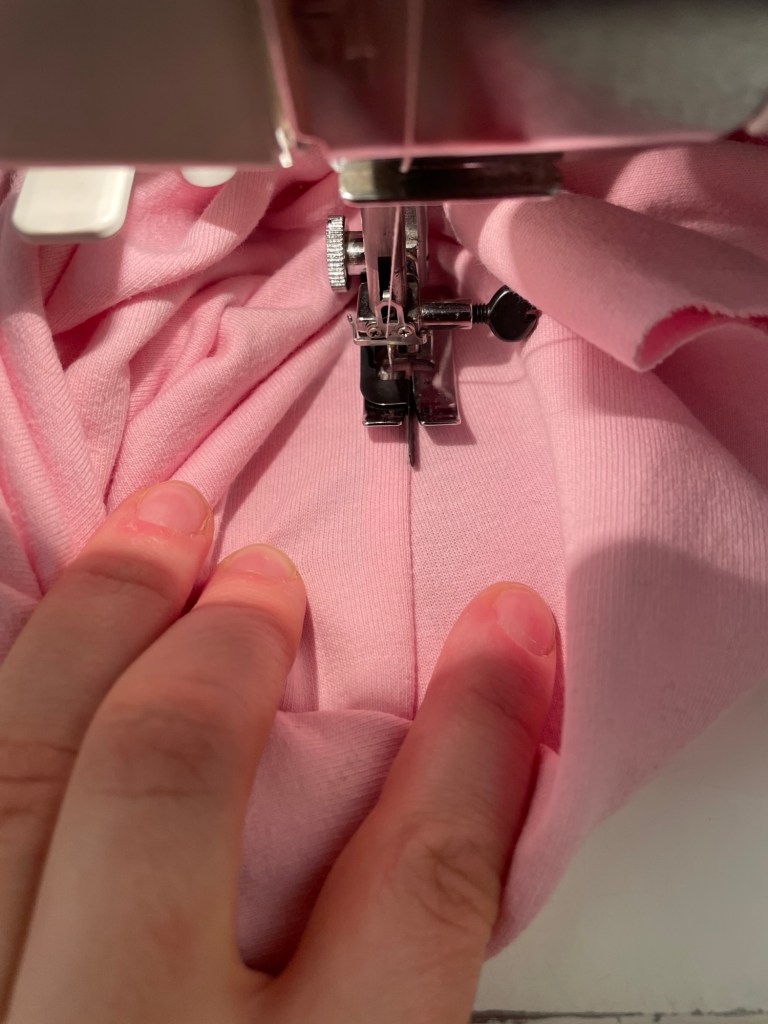
Now go back to your sewing machine and understitch the seam allowances to the pocket bag. For my pink version I chose to stitch about 1/8” away from the edge with a 4mm stitch.
Now give it a good press. Sew a straight stitch just below the curved edge, making sure to go over the section a couple of times. This helps reinforce the curved ends and also helps keep the pocket bag in place.
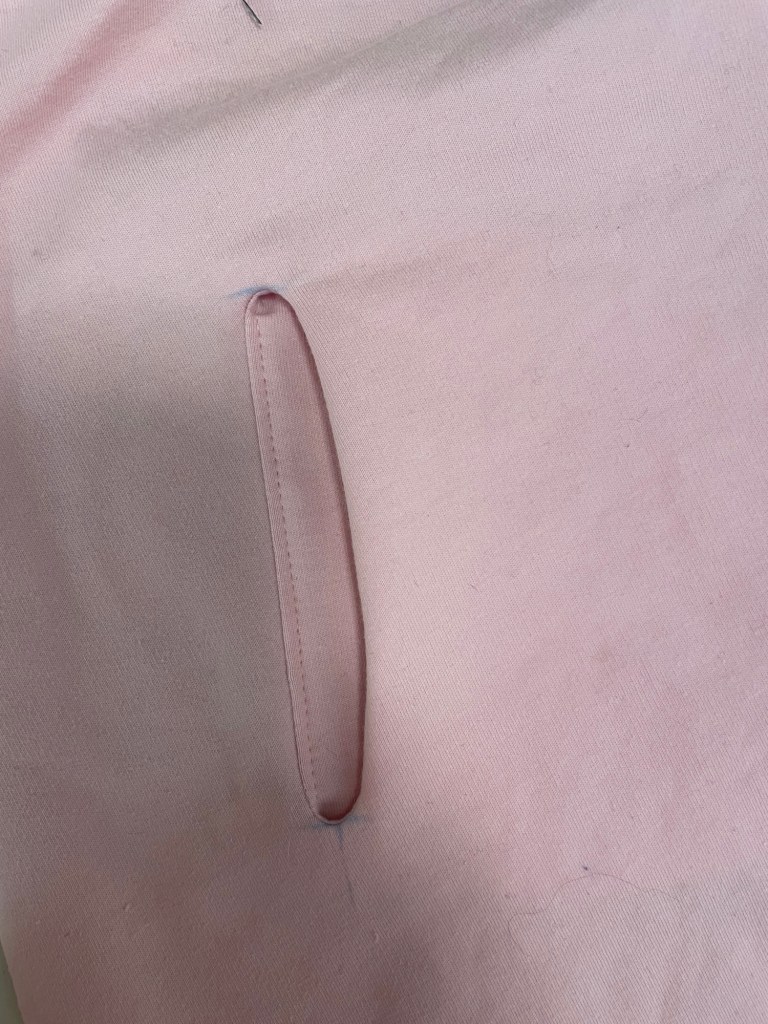
And you’re done!
Other Construction Notes
I don’t have a coverstitch machine that can do the five thread double sided coverstitch that Ottobre recommends, so instead I topstitched all serged seams with the help of my stitch in a ditch foot, using a 4mm length straight stitch with the needle moved all the way over to the left. I’ve seen this finish done with plenty of RTW. It looks clean and helps manage the bulk of the seam.
The hardest part of this hoodie is sewing the pockets. Once that’s done it is pretty straightforward construction.